


oldlady
-
Posts
6,356 -
Joined
-
Last visited
Content Type
Profiles
Forums
Gallery
Posts posted by oldlady
-
-
victoria, if you have not yet purchased it, consider it's age when offering a price. i sold one of them a couple of years ago for $100. right now, because people are confined by covid, prices on places like ebay are ridiculously insane. where do sellers get these ideas that an old kiln should cost $4,000?
there was an ancient amaco 2 speed wheel for about $2,000. schools getting rid of old equipment auctioned them off for about $20 last year.
be careful of what you buy but an econokiln by L&L is a good by if the price is right.
you might want to read other posts on the forum under this heading.
-
OK, you two. are you talking about an author? i have been through so many of them this year that my library is searching for some to keep me busy. spill it, please.
best so far Cup of Light. by nicole mones. (porcelain
 )
)
-
denise, you might be more comfortable trying a technique i use to make bowls. i think your husband is a woodworker if i am remembering correctly. a woodworking friend made me a series of discs from walnut. they ranged from 4 inches to about 8 inches in diameter and were each about 3/8 inch thick. they thinned at the edges.
to make a soup size bowl, i would use about a softball size piece of clay and center it. opening it and making it into a flowerpot shape with a slightly thick bottom is next. when the pot is about 5 inches high, firmly insert the disc that is about 5 inches in diameter. just push it straight down to the bottom of the flowerpot shape without hesitating. the clay will widen into a perfect half sphere on the interior and push the excess clay outward and down. the height will be less than the 5 inches you started with. remove the disc when you reach the intended bottom of the bowl. do not go too deep or you will have no clay for a foot.
use a circular ribbon tool to cut the excess clay (that was pushed down to the bat) in a single pass and stop the wheel while you remove that large amount all at once. this takes a little practice and a lot of nerve. and a good ribbon tool. not the thick ribbon that won't fit over your thumb, the thin one that will allow a quarter to pass through the circle.
your trimming is almost complete at this step. do a series and allow them to dry enough for trimming in the usual way.
-
depending on where you are, $600 seems a high price for a small, used kiln. can you get the owner to photograph the inside so you can see the elements inside their grooves? if they are upright they may have only been used lightly, perhaps for only cone 06 earthenware. if you can find out who used it, that might help, too. perhaps someones' mother or aunt who made china dolls. earthenware china.
what else comes with the kiln, shelves, posts, anything?
-
the size of the kiln shelf is a real help. i have traced the shelf onto my white slab roller top. making something too long to fit is not a good idea. it also allows me to trial fit the forms i use for slab work on a shelf so i can tell if a new shape is profitable. and it gives me an idea of what odd corners might be available for small fast sellers.
-
-
min, so did i . and, there are no arrows on those gallery photos so trying to see enlarged versions is a real pain. (unless i just don't know how)
-
-
going to try to post this in the correct sequence. first photo shows the slab that i rolled leaves into and the birds made with craft foam sheets. they are rolled deeply, using a better type roller than the usual pottery pony roller. the entire slab started at a thickness close to a quarter of an inch or about half a centimeter. after rolling, the entire slab is compressed to a thinner profile, making it strong but not bulky. the entire slab, not just where things show. you CANNOT do this with a kitchen rolling pin! i do use a rolling pin after everything is finished just to allow the slab to settle.
just below the slab is the tray i use for shaping my tray. i got it from a thrift shop and find they work great as supports if the surface is totally covered with WD-40. i know you might use something else but this is how i work.
the second photo shows the slab partially placed inside the supporting tray and a cheese cutter that i use to cut the edges so i can follow the leaf design and use the side of the tray for the center section.
the third photo shows a different tray after taking the foam birds out. the edges have been cut and the next step is to use a needle to lift the leaves out of the clay.
continued below....


-
neat! just be careful lifting that lid!
-
the wrist immobilizer is only for overnight. way back in the 70s i used to wake up with my hands feeling cold. i started out wearing wool socks over my hand and wrist. that let me sleep. maybe your hands are not cold buy mine were and they still get cold easily. maybe that is circulation. yet, my mother would sleep with her feet outside the blankets even when it was cold in the house. we are all different.
i saw the neurologist because the hand cramping worried me. he tested me for carpal tunnel and found that it was not severe but suggested i wear the immobilizer overnight. that was over ten years ago. i stopped making the little fish that were causing the cramping problem and never do that stroking in the opposite palm anymore.
-
dottie, not medical advice just comfort advice here. i have slept with my hands covered and warm for many years. after seeing a neurologist many years ago, i got the wrist immobilizer he recommended. it is not a flimsy thing you can bend, it is very sturdy and has lasted 10 years so far. check out the bell horn brand wrist immobilizer, it was intended to prevent carpal tunnel problems. i can use my hands as well as anyone many years younger without pain. EXCEPT for pushing a slab into the middle of the left hand with the thumb on the right. stroking the clay into shape cramps up the hands but i do not have visible arthritis. maybe it is hereditary, thanks, mom and dad.
now, if i could just get the handlebars on my bike changed to the old kind that bend instead of the straight horizontal rod that is on it now.
-
maven, are you familiar with using a kiln sitter? check to see that the button is pushed in before you put a cone across the bars.
-
did a few chess sets in the 1970s and gave them away. made some really detailed angels and sold them at my office for christmas. nearly went blind keeping striped underglazes separated and sold all of them at $4 each. idiotic. never again interested in slipware.
-
-
lee, nice job. may i suggest one tiny step further at the exact place in the making cycle that these are? if you move them to touch the long sides and place an old piece of cloth over them all, you can run a tool down the grooves between the pieces to soften the sharp rectangular edges (a rounded pencil eraser comes to mind as the tool) doing two at the same time.
-
-
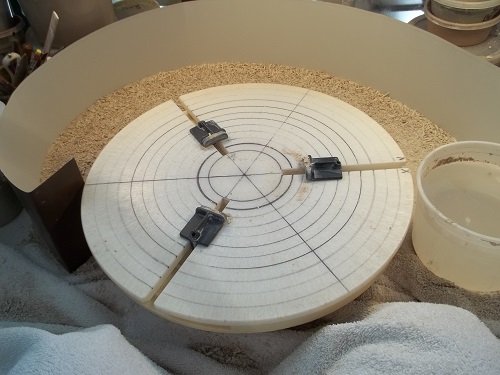
cstovin, i had a similar problem with the replacement GIFF I N GRIP years ago. i found that i had not set it up properly, one of the rows of tiny, teeny, tiny grooves was off by one groove.
there is another problem i have seen with it, if you put it down on top of a bat pin, it will ride around like a tilt-a-whirl at an amusement park. the cure for that is marking the wheel head with a sharpie once you have it set perfectly. run a line down both sides of the bottom grips and use that line next time and forever after.
another tip is to put concentric circles on the grip to make the initial placement easier.
i rarely used the taller posts, but noticed when i did that they must be seated FIRMLY in the slot before use.
-
how about the day when i was loading the kiln and i readjusted some items on a shelf and put the shelf down, loaded another one above it and continued to the top. when i opened the kiln and removed the shelves, one had a vase stuck to the bottom of it. there was no post next to the vase and it was about a quarter of an inch shorter than the other 2 posts across from the vase so i never realized i had put the shelf down on the vase and not a post.
and i thought i had formed the habit in the beginning of putting the posts in first before loading anything.
-
ok, i don't mean to say that nobody juries the work for quality before admitting somebody. just that the fee is unusual. maybe that is because i have never done the really big shows. and yes, sometimes the "jurying" is incompetent and i would up next to a double tent of dog collars. once was enough there.
-
liam! JURY FEE????? for a show where you would sell your work in your own booth? the only jurying i have had was just to see if you are making your own work, no kits, no barbie doll clothes.
the Jury fee shows are usually just so you can brag about getting into some big deal museum show or something where they only allow you to sell a few pieces that have been juried in.
-
oh, hulk, that brings back some really good memories. our very tiny, 113 students in my grade, class put on some really fine musical performances. it was a small catholic school in detroit and we had a nun who was a former opera singer. i just wish i could find the 4 part Ave Maria we did. we performed in the church mostly, was surprised to find it is now the cathedral for detroit.
-


Old Orton Controller
in Equipment Use and Repair
Posted
grumpy, if the kiln has been stored where flying insects can get to it, check for tubes of clay in the tiny spaces you might find. check the slits in the metal box.