


PeterH
-
Posts
1,496 -
Joined
-
Last visited
Content Type
Profiles
Forums
Gallery
Posts posted by PeterH
-
-
2 minutes ago, Jeff Longtin said:
So I wonder: does the "weight of water" still hold true that one gram of water, by weight, equals one milliliter of water, by volumn?
Sort of, but ...
- The SG of water varies with temperature.
- Dissolved solids will increase the SG (mainly thinking of hard water).Size of the effects on SG seem small enough to ignore "for government work"

https://www.hillcrestplumbingandheating.com/b/hard-water-vs-soft-water-debate-finally-solved
The Guidelines for Canadian Drinking Water Quality Hardness rank hard to soft by CaCO3 levels. Here are their guidelines:- Soft Less than 60 mg/L
- Medium Hard 60 to 119 mg/L
- Hard 120 to 179 mg/L
- Very Hard 180 mg/L or greater
-
Can you confirm that you are using CMC, not the Ceradel label gum.
-
2 hours ago, Rae Reich said:
Resin, Femo or Egyptian paste, in my opinion would be more ‘wearable’ materials for a finger because they do not fracture as sharply when broken or chipped. It’s a romantic idea but makes me cringe thinking how Porcelain shards are very sharp. (Maybe my hands get into more mischief than some other folks)
Few materials can provide the truly remarkable durability of a metal ring.
So would it be an idea to produce a set of three, to provide a backup in the event of wear/accident.
-
What started me looking at how you carved/machined rings.
https://www.etsy.com/hk-en/listing/815905438/set-of-almond-wood-resin-couple-rings

En masse
https://tinyurl.com/2p9y83sy -
I stumbled across "ring" drills. Posting the info in case anybody is interested.
video: https://youtu.be/8QWjEqZUa3g?t=155
adverts:
https://tinyurl.com/5yev7etz
https://tinyurl.com/2jd32fye -
oops, don't know how to delete.
-
I've not heard about firing "craft" ceramics directly in a microwave, though I would be interested to hear about it.
I have heard about mini-kilns that you can heat in a microwave, and hence fire things inside them. Goodness knows how you control the firing profile.
They seem to be really tiny and <£100, sometimes <<£100.
Things To Consider Before Buying A Microwave Kiln
https://www.soulceramics.com/pages/microwave-kiln-things-to-consider
As mentioned above, not all firing projects are suitable to be processed in a microwave kiln. Most ceramics, for example, require a much higher heat than a microwave kiln can generate. Generally, microwave kilns can reach a maximum temperature of around 900°C, which is most suited to glass and jewellery projects.
... that's about cone 010.Microwave Kilns: Great Tools for Testing Low-Fire Lusters, Enamels, and China Paints
https://ceramicartsnetwork.org/daily/article/Microwave-Kilns-Great-Tools-for-Testing-Low-Fire-Lusters-Enamels-and-China-Paints
While the kilns don't fire high enough to test higher temperature glazes or clay bodies, they can really help out if you are interested in low-fire decorative applications such as china paints, lusters, Egyptian paste, overglaze enamels and many commercial decals. In this post, Jessica Knapp tells you all about this alternate use for old microwaves!
A microwave kiln is a container kiln consisting of a base and hood made for use in a household microwave oven. The kiln is made of a white insulating fiber and lined on the inside of the chamber with a black compound that absorbs the microwave radiation and heats up to 1650°F or approximately cone 010 (figure A). The heat from this compound is then transferred to the chamber and to the piece being fired. It takes between 5 to 10 minutes to reach peak temperature ranges depending on the size of the microwave kiln, the work being fired, and the microwave’s wattage. After the firing, the kiln needs to cool for at least 20 minutes before being opened.Are you certain you cannot find somebody to fire it for you in a normal kiln, perhaps one of those paint-a-plate shops.
PS I certainly wouldn't use the microwave for heating food afterwards. Some people recommend buying a 2nd-hand microwave for this.
Some people claim to have some success (but cone 010?).
-
6 hours ago, blackthorn said:
Thank you Peter! I hope my short version matches your expectation.
Considerably surpasses it in ingenuity.
-
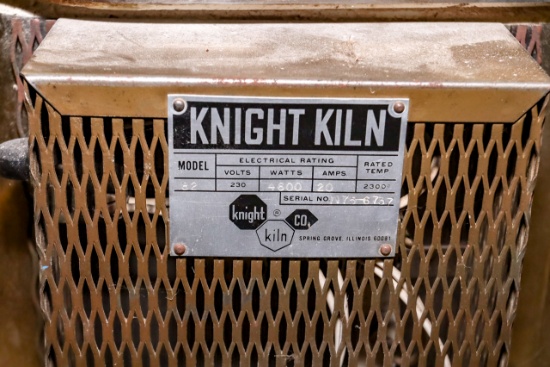
I'm confused, the plate seems inconsistent, saying: 127/220 volts, single phase, 9 amps, 3300 watts. But 220v*9a = 1980w not 3300w.
If there is a single infinite switch I guess it will need to be rated for at least 3300w/220v=15a rather than 9a -- unless you are sure that the plate wattage is incorrect.
-
13 hours ago, Min said:
I developed my porcelain cone 6 slipcasting body then made a plastic version of it for pulling handles. I attached the handles to the cast mugs as soon as the mug bodies were able to be handled (no pun intended). I had pulled and formed the handles and allowed them to dry as much as possible but still be flexible enough to join to the cast bodies. My logic was to minimize the shrinkage difference between the cast body and the pulled handle. Just about every handle still shrank so much more than the body that the handles had serious cracks at the joins. Given that this is just one experience it might not be indicative of what is typical but given that a plastic body is going to shrink more than a non-plastic (casting) body my hunch is it could very well be the norm.
If you were attaching sprigs or other non load bearing attachments then perhaps it has a better chance of working.
Valuable experience.
To emphasise the obvious: if @kawaiidumpling wanted to follow this approach they would need to make a casting-slip version of a commercial "sculptural" body. (As you cannot remove the deflocculant from a slip-casting body.)
-
Congratulations, some very ethereal results.
Could you give a few more details of your process? I'm assuming it's something like:
- Inkjet printing onto paper?
- Sprinkling oxide/stain powder onto damped paper?
- Press clay onto image?PS Vague memories at the back of my mind ( probably from reading about laser-printed transfer plates) suggest that pre-treating your digital image before printing it might change the nature of your final images. For example, digitally process your image to produce either a "halftone" B&W image or a low-resolution one. (Perhaps try 100dpi to see the effect, then maybe 300dpi in practice.) Print them at whatever resolution your printer has. You might get a more accurate greyscale.
-
You could also make/buy texture sheets/rollers to provide a low-relief background for your sculptures.
e.g. https://www.etsy.com/uk/market/polymer_clay_texture_sheet -
15 minutes ago, Adorbubble said:
Uploaded them here as file sizes too big https://imgur.com/a/VJZ3flO
Posted the plate for the record

-
2 hours ago, kawaiidumpling said:
An average electric wheel is over $2000 so I do see molds as the only affordable DIY option for now (ceramic season is over as well, so barely any courses available locally).
Still arguing for using the same body for mug and sculptures. If you want/need to attach hand-build sculptures, why not hand-build the mug.
101 on making a slab mug, with tips on rolling out the clay if you are unaccustomed to hand-building
https://thepotterywheel.com/slab-built-mugs/Personally I prefer to join round a tube of some sort, as in
https://clairepalmerphotography.wordpress.com/2014/05/13/how-to-create-a-cylinder-vase-slab-building/ -
FYI tried to find the voltages
I see you are in the US, a US page
https://www.hot-clay.com/nabertherm-top-190-pottery-kiln-free-uk-delivery.html?gad=1&gclid=EAIaIQobChMIjcH8s4HA_gIVMYBQBh3gDAqeEAQYAyABEgIKX_D_BwEgives

On p46 of the English catalogue https://nabertherm.com/sites/default/files/2023-02/artscrafts_english.pdf

-
Do you have any porcelain clays in mind? What cone do they need to be fired at, and can you reach those temperatures? Mugs need to be waterproof, so you would probably need to fire to maturity.
If you made moulds from your sculptures you could slip-cast them in the same casting slip and apply them to the freshly cast mug, largely avoiding compatibility/shrinkage issues. Easier if you restrict yourself to low-ish relief with no undercuts, but you could go the full multipart figurine route.
-
From http://www.potters.org/subject03706.htm my emphasis
Vince Pitelka on thu 21 nov 96
I have been putting holes on the foot(s) of my platters for hanging, and
they keep
>filling up with glaze.
I also place holes (1/8"-dia.) through the foot of my platters. I have
eliminated the problem of glaze flowing into the holes by threading a damp
pipe-cleaner through the holes and leaving it there while I glaze the wares.
I then remove the pipe cleaner, re-moisten it, and run it in and out of the
hole a few times. This seems to remove enough glaze from around the
openings that the glaze does not flow into them. Of course, I tend to apply
my glazes thinly, which certainly makes them less likely to flow.
- Vince
Vince Pitelka - vpitelka@Dekalb.Net
Phone - home 615/597-5376, work 615/597-6801
Appalachian Center for Crafts, Smithville TN 37166 -
15 minutes ago, Piedmont Pottery said:
This looks like crushed up wine bottle glass in the bottom covered with a transparent glaze.
If so this thread may be of interest
This thread referenced a paper, but the link provided is dead.
The_Combination_of_Glass_and_Ceramics_as_a_means_of_artistic_expression_in_studio_practice_Jessamy_Kelly
This paper can still be found at several places, including
https://sure.sunderland.ac.uk/id/eprint/3656/1/The_Combination_of_Glass_and_Ceramics_as_a_means_of_artistic.pdf -
11 hours ago, Pres said:
My other favorite tool I used to day, and it is the trimming chuck that holds the chalice stems for trimming without messing up the form or any decoration on the form. This was made from common plastic plumbing parts and is really much better than any chuck that I have used for trimming these forms.
Details at https://picworkspottery.blogspot.com/2016/11/trimming-chalice-stems.html
-
On 4/10/2023 at 10:27 PM, Ben xyz said:
Had considered this method, after having bought pre-colored porcelain once ($$$).
2 hours ago, Callie Beller Diesel said:Using them in large quantities in, say a casting slip, is still going to be kinda spendy,
... although in this case you could reduce the cost by casting a thin coloured layer backed by a thicker white one. (But might have issues where the white shows.)
e.g. https://ceramicartsnetwork.org/daily/article/Slip-Casting-Ceramics-Using-Colored-Casting-Slip
Wet the mold with a sponge. Pour the colored casting slip into the mold and let it set up for approximately ten minutes (figure 5). Then pour the colored slip out of the mold and let it drain figure 6). Once the slip has stopped dripping from the mold, immediately pour in the white casting slip. Leave the white slip in the mold for about 30 minutes before draining. The longer you leave the slip in the mold the thicker the piece will be. I prefer to make my pots just a little on the thicker side.
- Callie Beller Diesel and Min
-
 2
2
-
What defloculant(s) are you using? If there are other dispersants/rheological-modifiers about there may be interactions.
I've no idea how the various sorts of deflocculants interact, so speculation follows.
> Antiprex 461 is an aqueous solution of low molecular weight polyacrylic acid
> Alcosperse® 149 is a pale amber liquid acrylate-based dispersantBTW https://digitalfire.com/material/sodium+polyacrylate
Sodium polyacrylate dispersants like Allied Colloids 311 and Darvan #7 are used as an alternative to sodium silicate in casting bodies used in ceramics.If you are currently using a polyacrylate defloculant it might be worth trying to something else/in-addition as there are already polyacrylates about.
https://digitalfire.com/article/deflocculants%3A+a+detailed+overviewPS
Just for the record, a back-to-basics "lab-technician" guide to optimising the level of deflocculant in a slip
https://static1.squarespace.com/static/527ac372e4b0d4e47bb0e554/t/527fd7f1e4b0c046bfa9b90d/1384110065234/Dispersant+Addition+Procedures.pdf... and a longer presentation with some pictures
https://www.yumpu.com/en/document/read/34584429/slip-casting-alfreds-clay-store
... I've no idea how this sort of clay interaction would react with the more ionic deflocculantsIIRC neither discuss the use of multiple deflocculants (except soda ash + sodium silicate)
-
Examples of Knight kiln-plates

-
On 3/25/2023 at 3:03 AM, Kelly in AK said:
For the people considering this problem, could materials agglomerate or crystallize in a glaze that’s sat around long enough and cause this?
This thread may be of interest.
-
11 hours ago, solene said:
Hi, I'd like to replace the element on my kiln . Unfortunately, this is the only model that has a broken link to the wiring diagram on the Cress website.
Looks like it's here http://www.cressmfg.com/wp-content/uploads/B23H-240-VAC.pdf

PS Broken link showed as

... and a google search for "B23H 240" (with the quotes) found it (even though access to the enclosing directory https://www.cressmfg.com/wp-content/uploads/ is forbidden).
- Hulk, solene and High Bridge Pottery
-
3


How to turn on and control the temperature on my 1990 Paragon Q-11-P
in Equipment Use and Repair
Posted
This thread may be of some help.