


High Bridge Pottery
-
Posts
2,566 -
Joined
-
Last visited
Content Type
Profiles
Forums
Gallery
Posts posted by High Bridge Pottery
-
-
I thought it was always good practice to switch the neutral too? Even though it is meant to be at 0v or ground that may not always be the case. I couldn't understand the specs on that if it was 25A per terminal or 25A overall but it seems like you say it's 9A per terminal. I wouldn't be surprised that they are on a knifes edge with the rating and how much the kiln draws.
If you ring Kilns and Furnaces they should provide you with a wiring diagram.
-
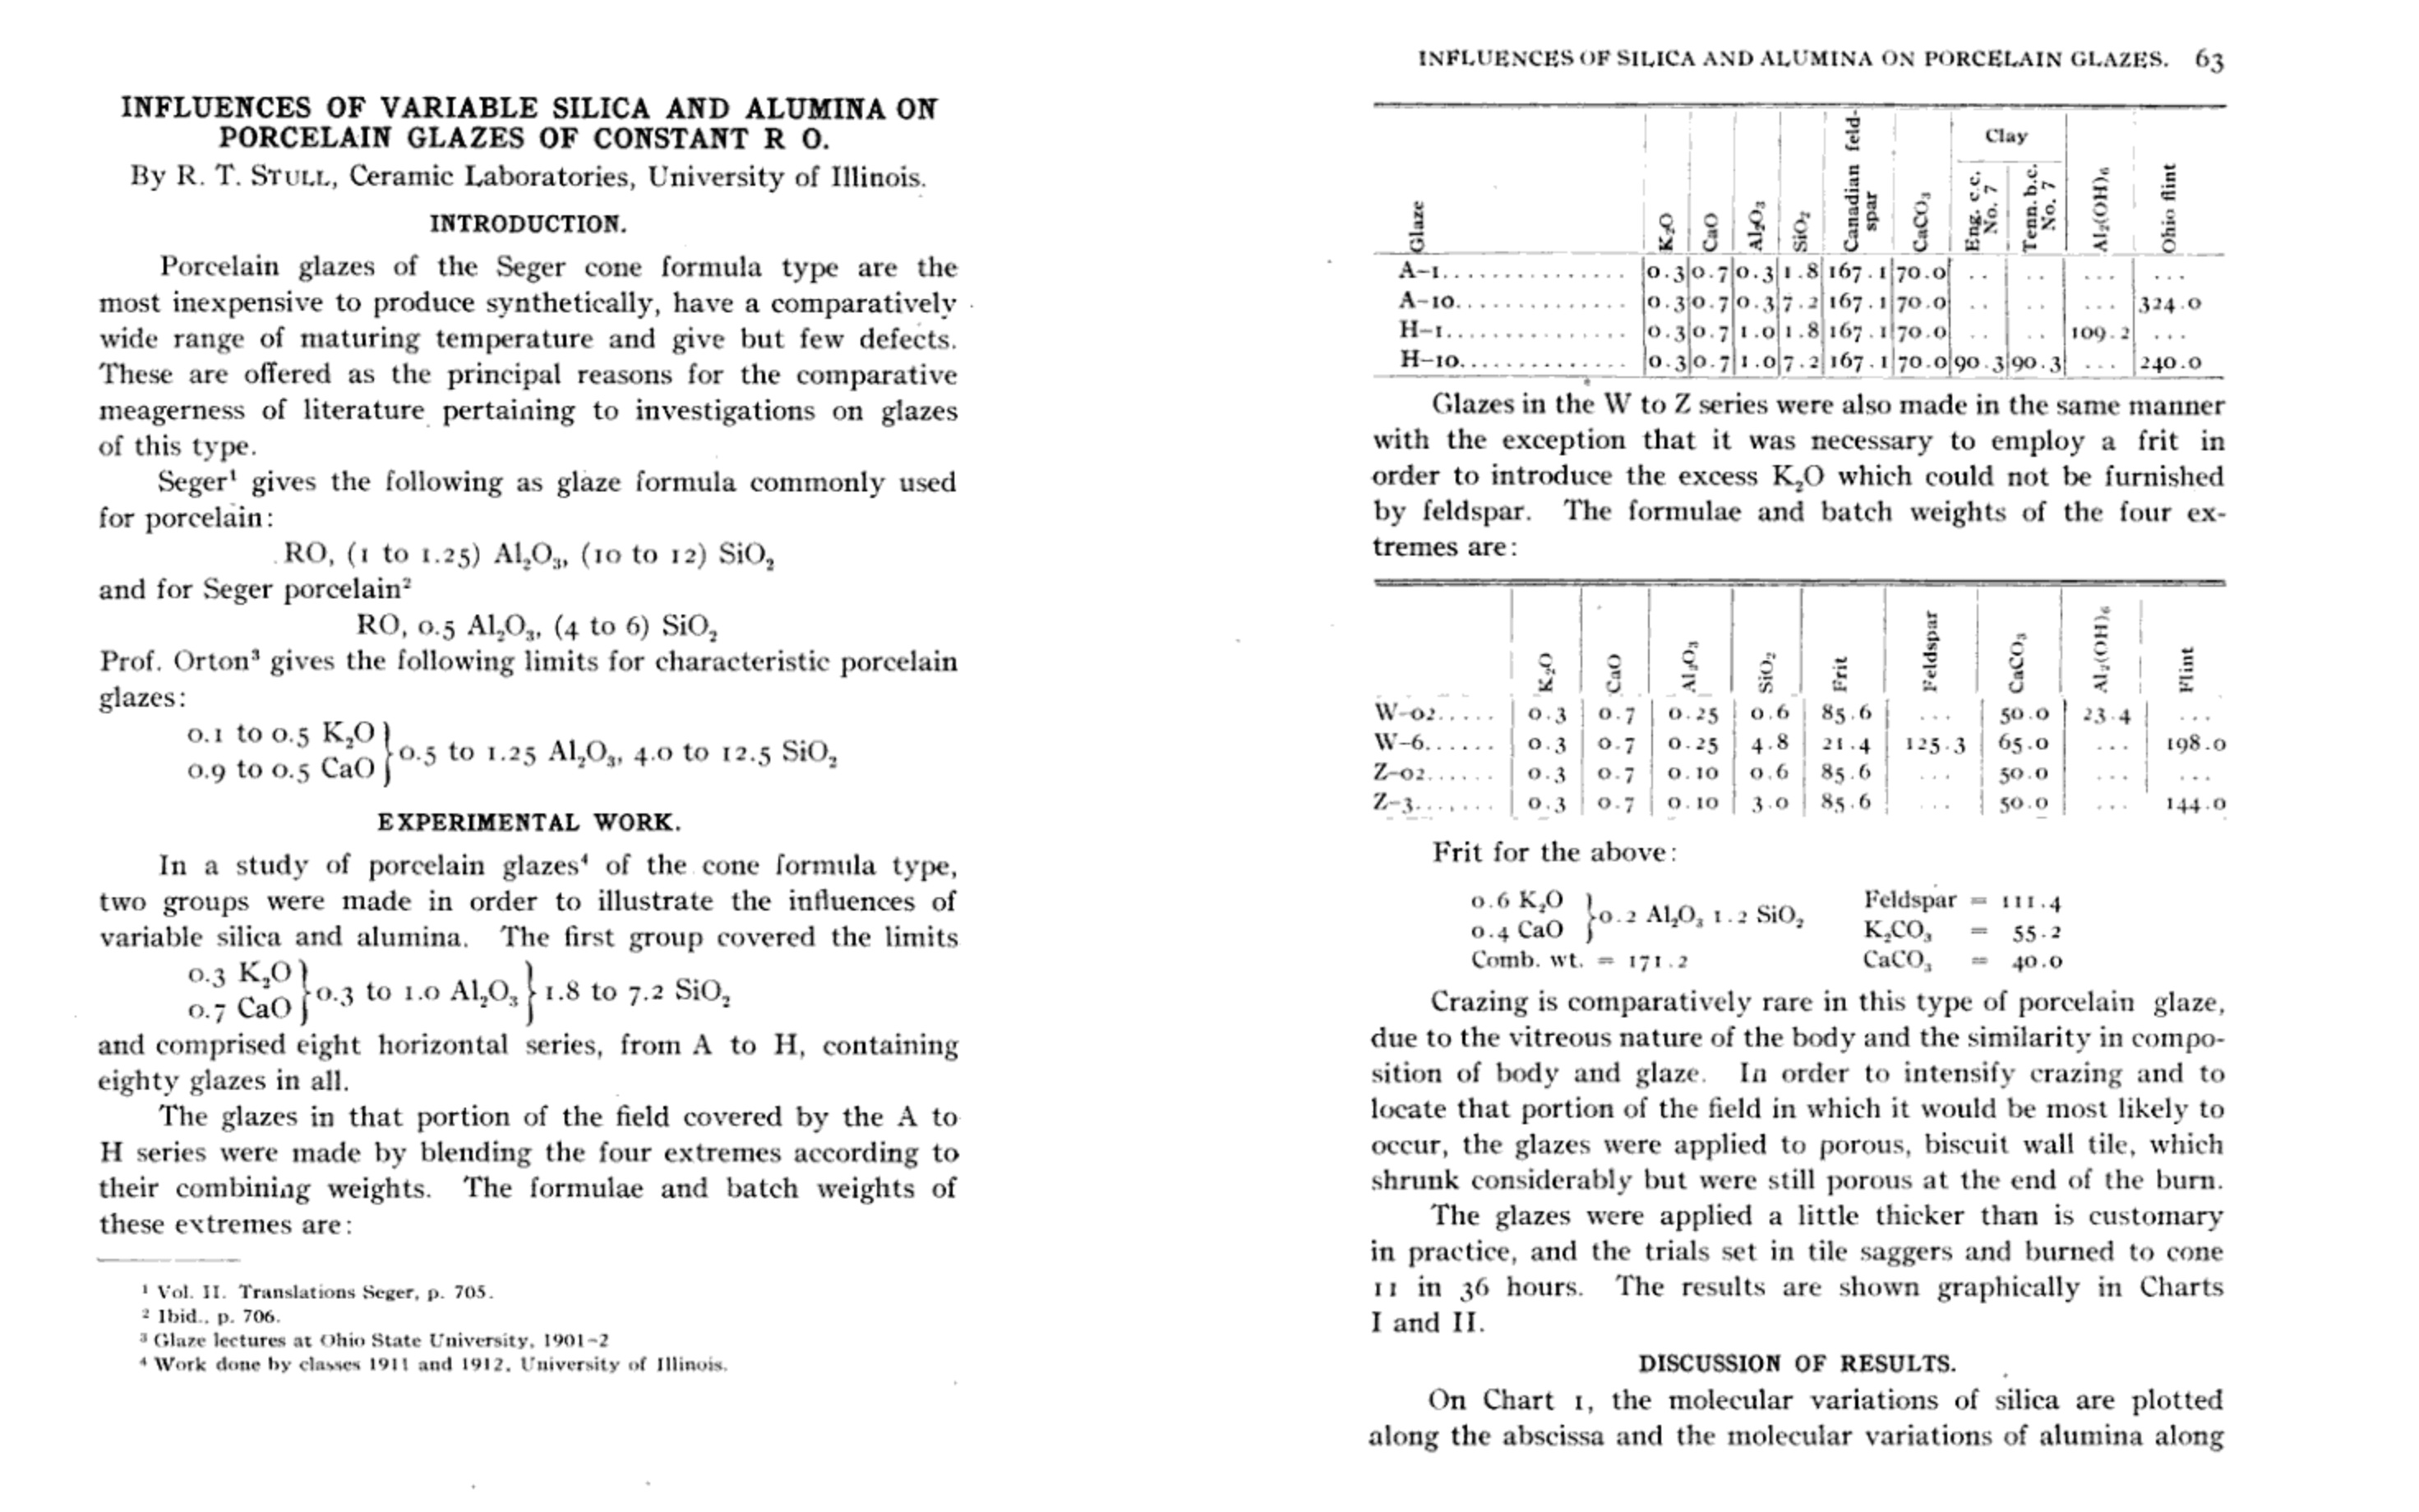
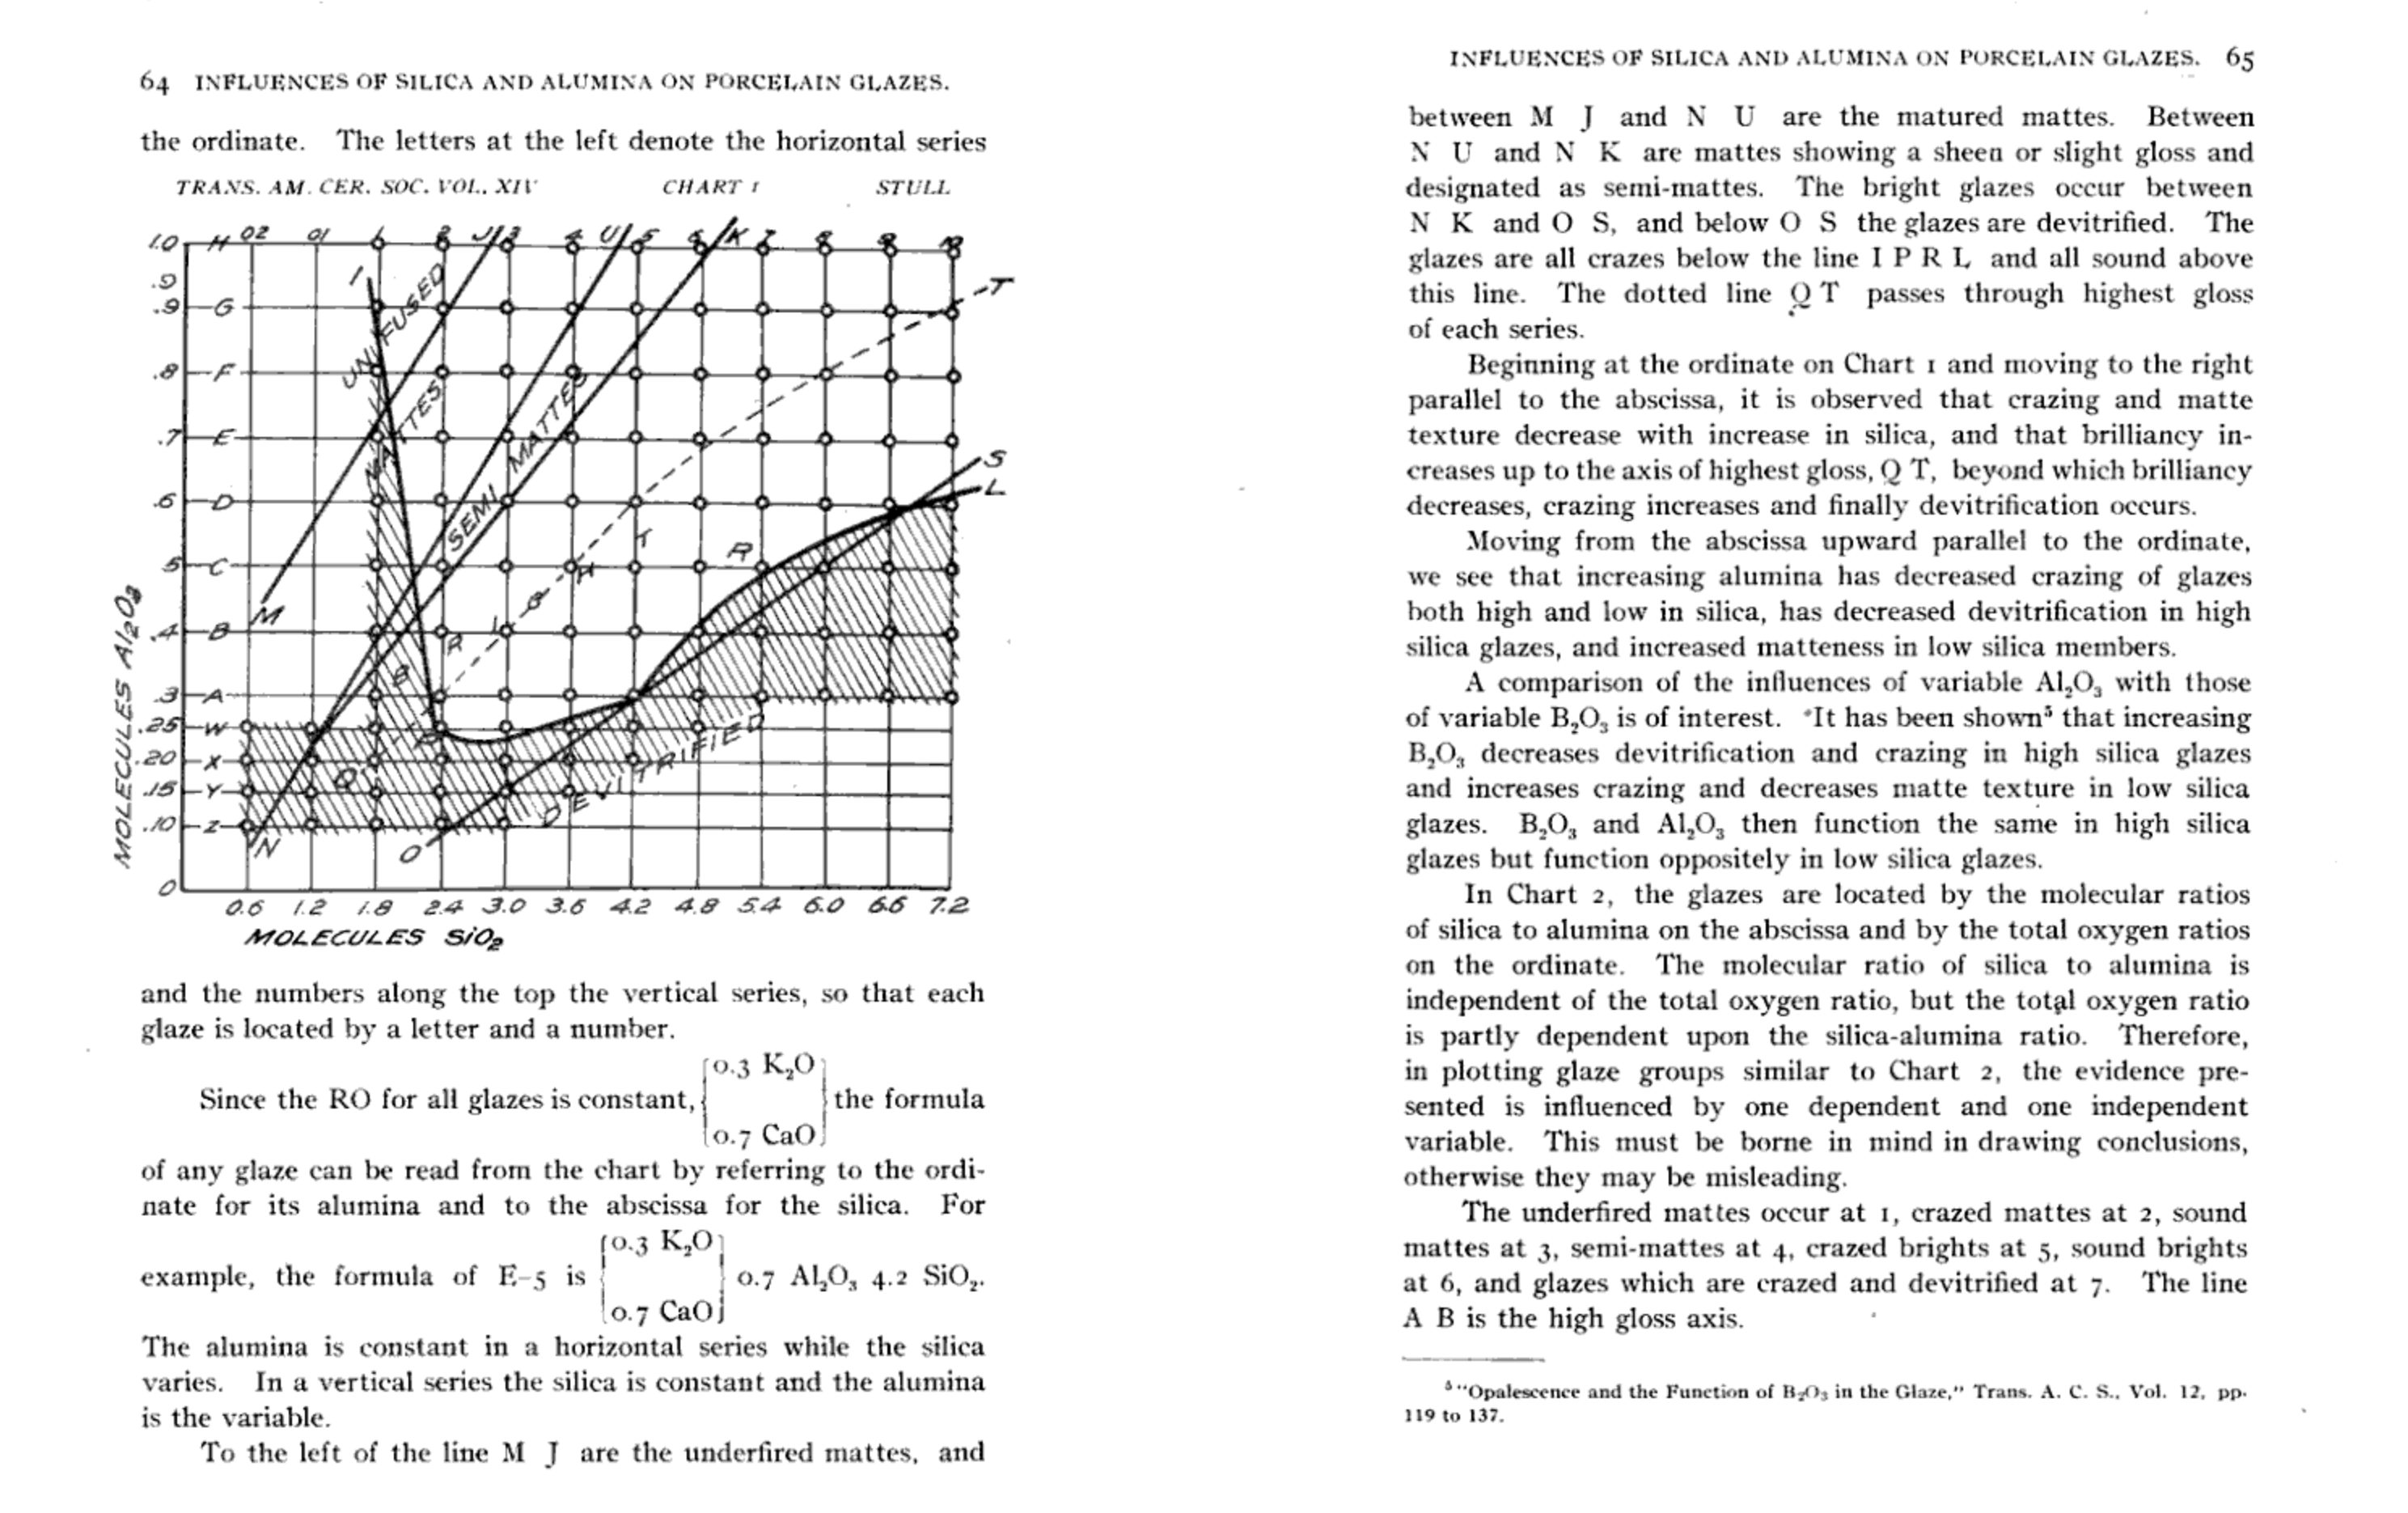
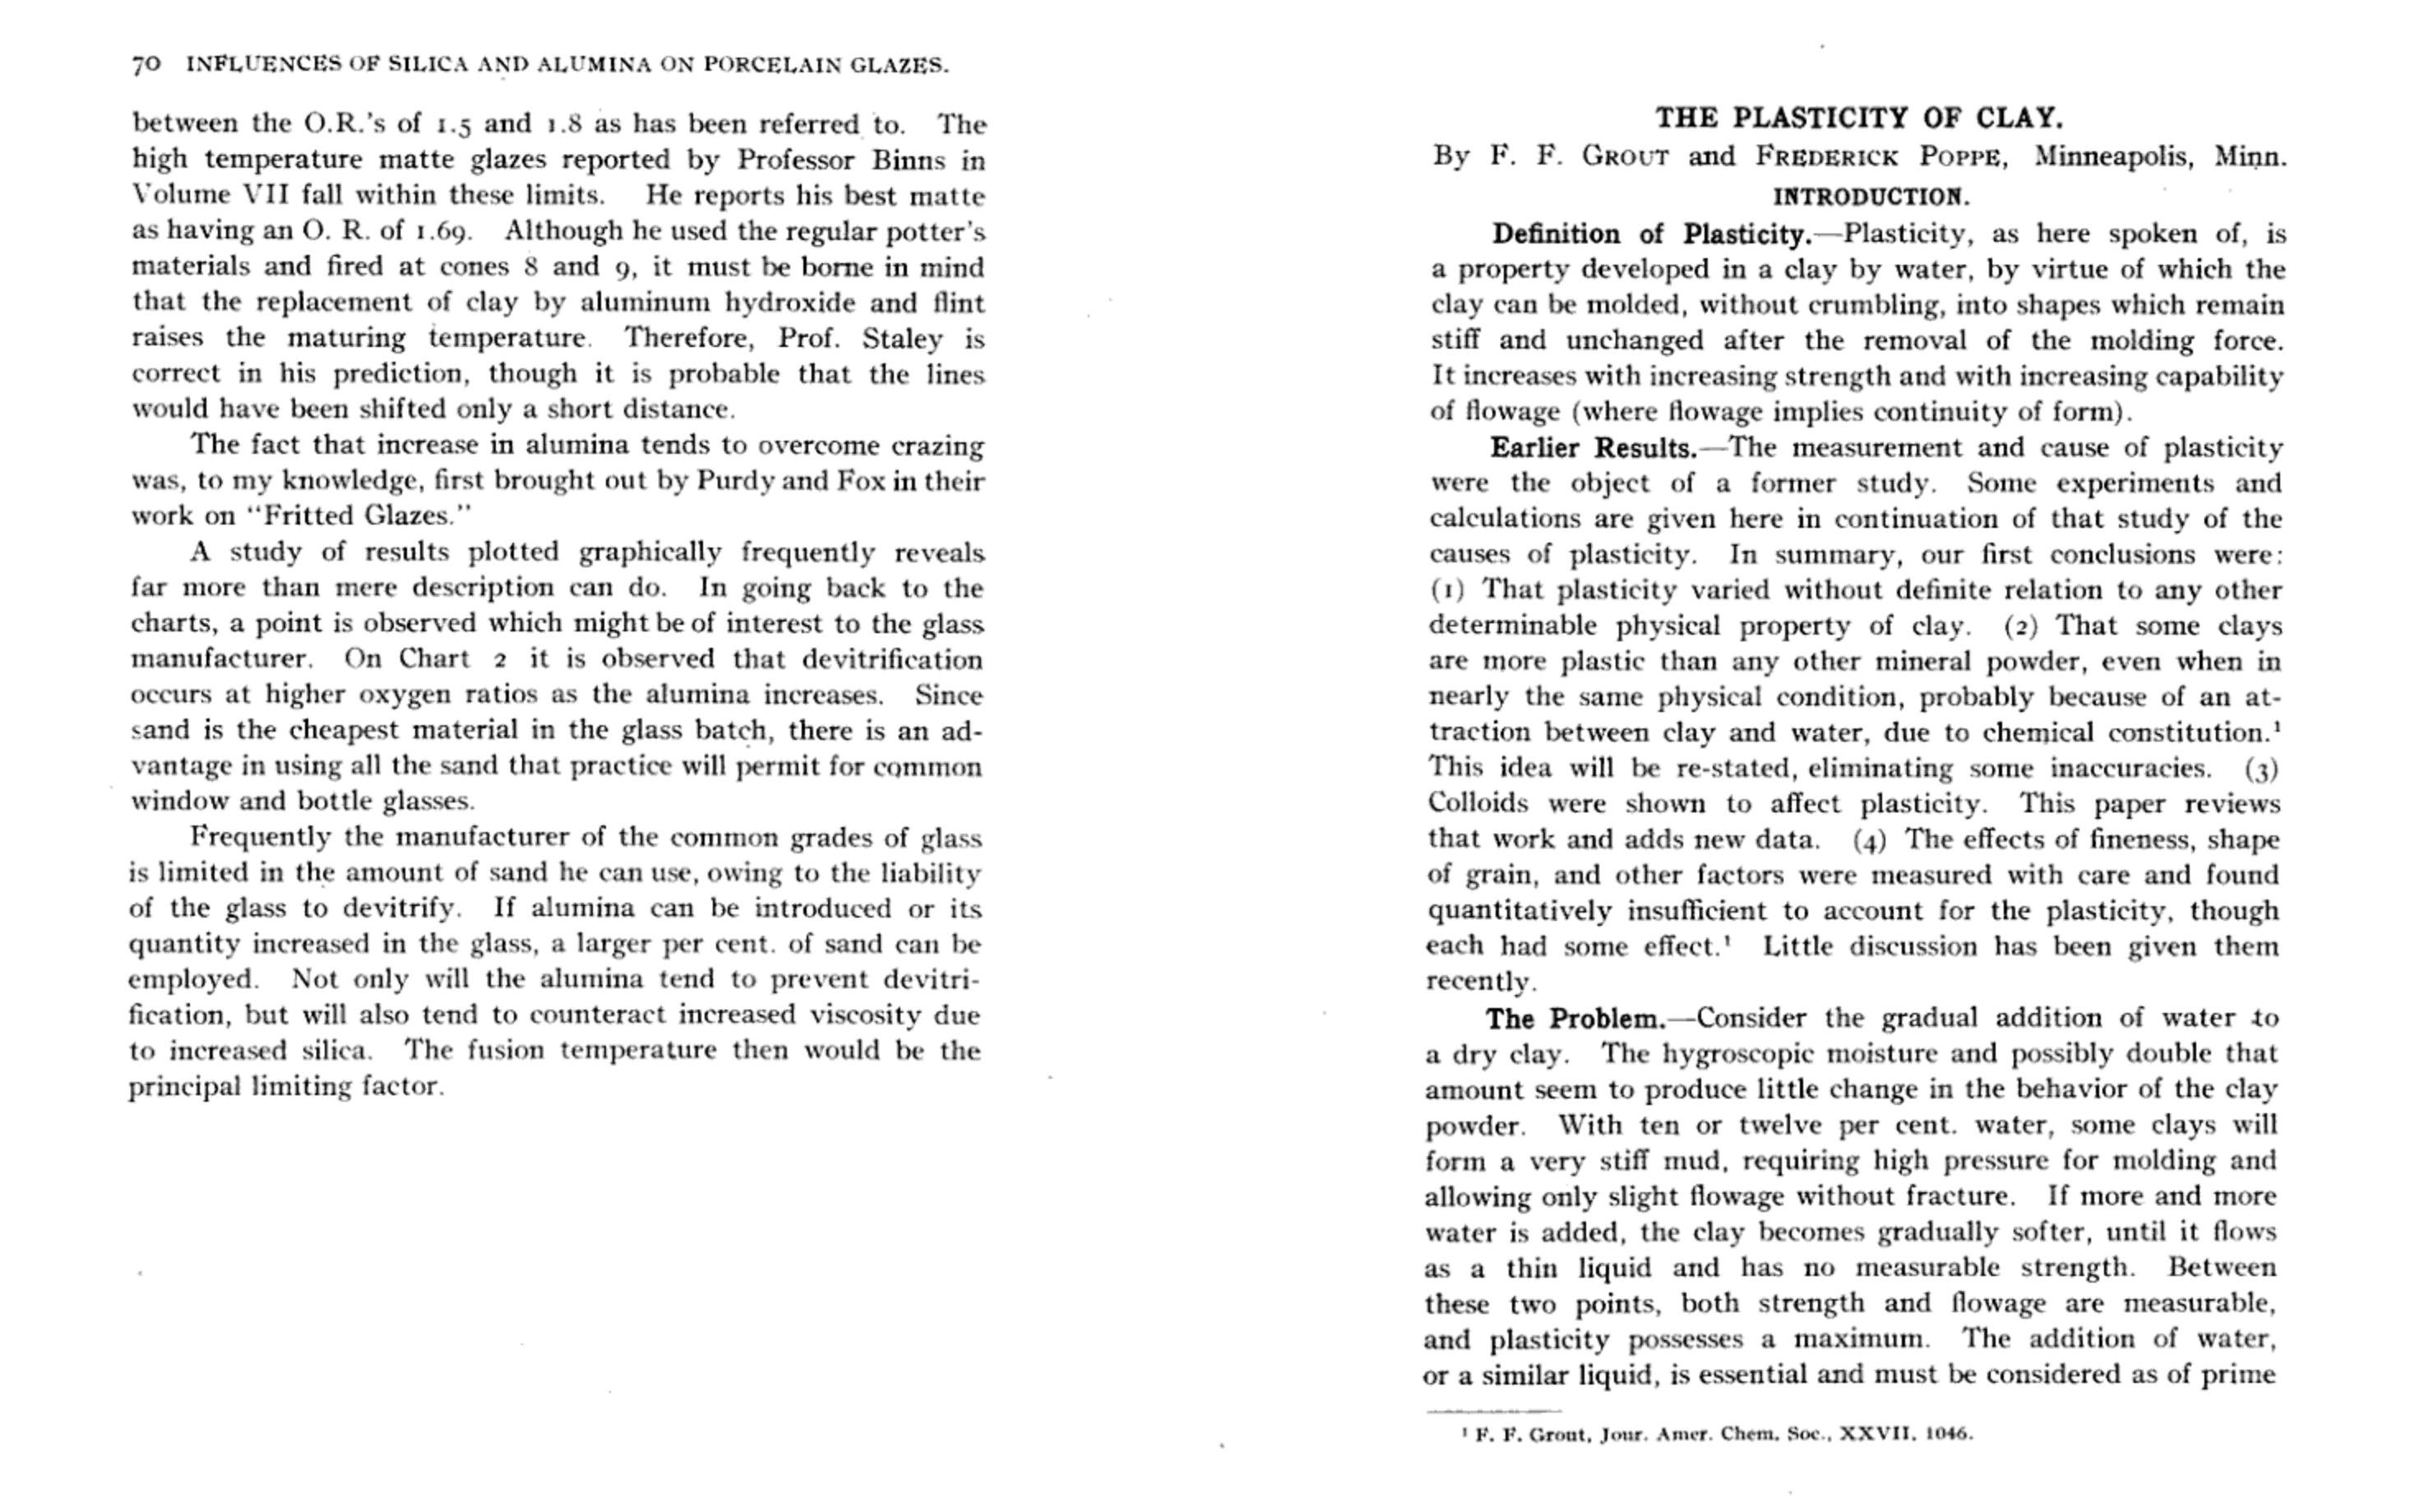
So I didn't want to completely derail bees and stones topic and go way off on a tangent but I found myself wondering what Stull had to say about his chart and any insight into matte glazes he had. After finding his research a very interesting read I wanted to share it here.
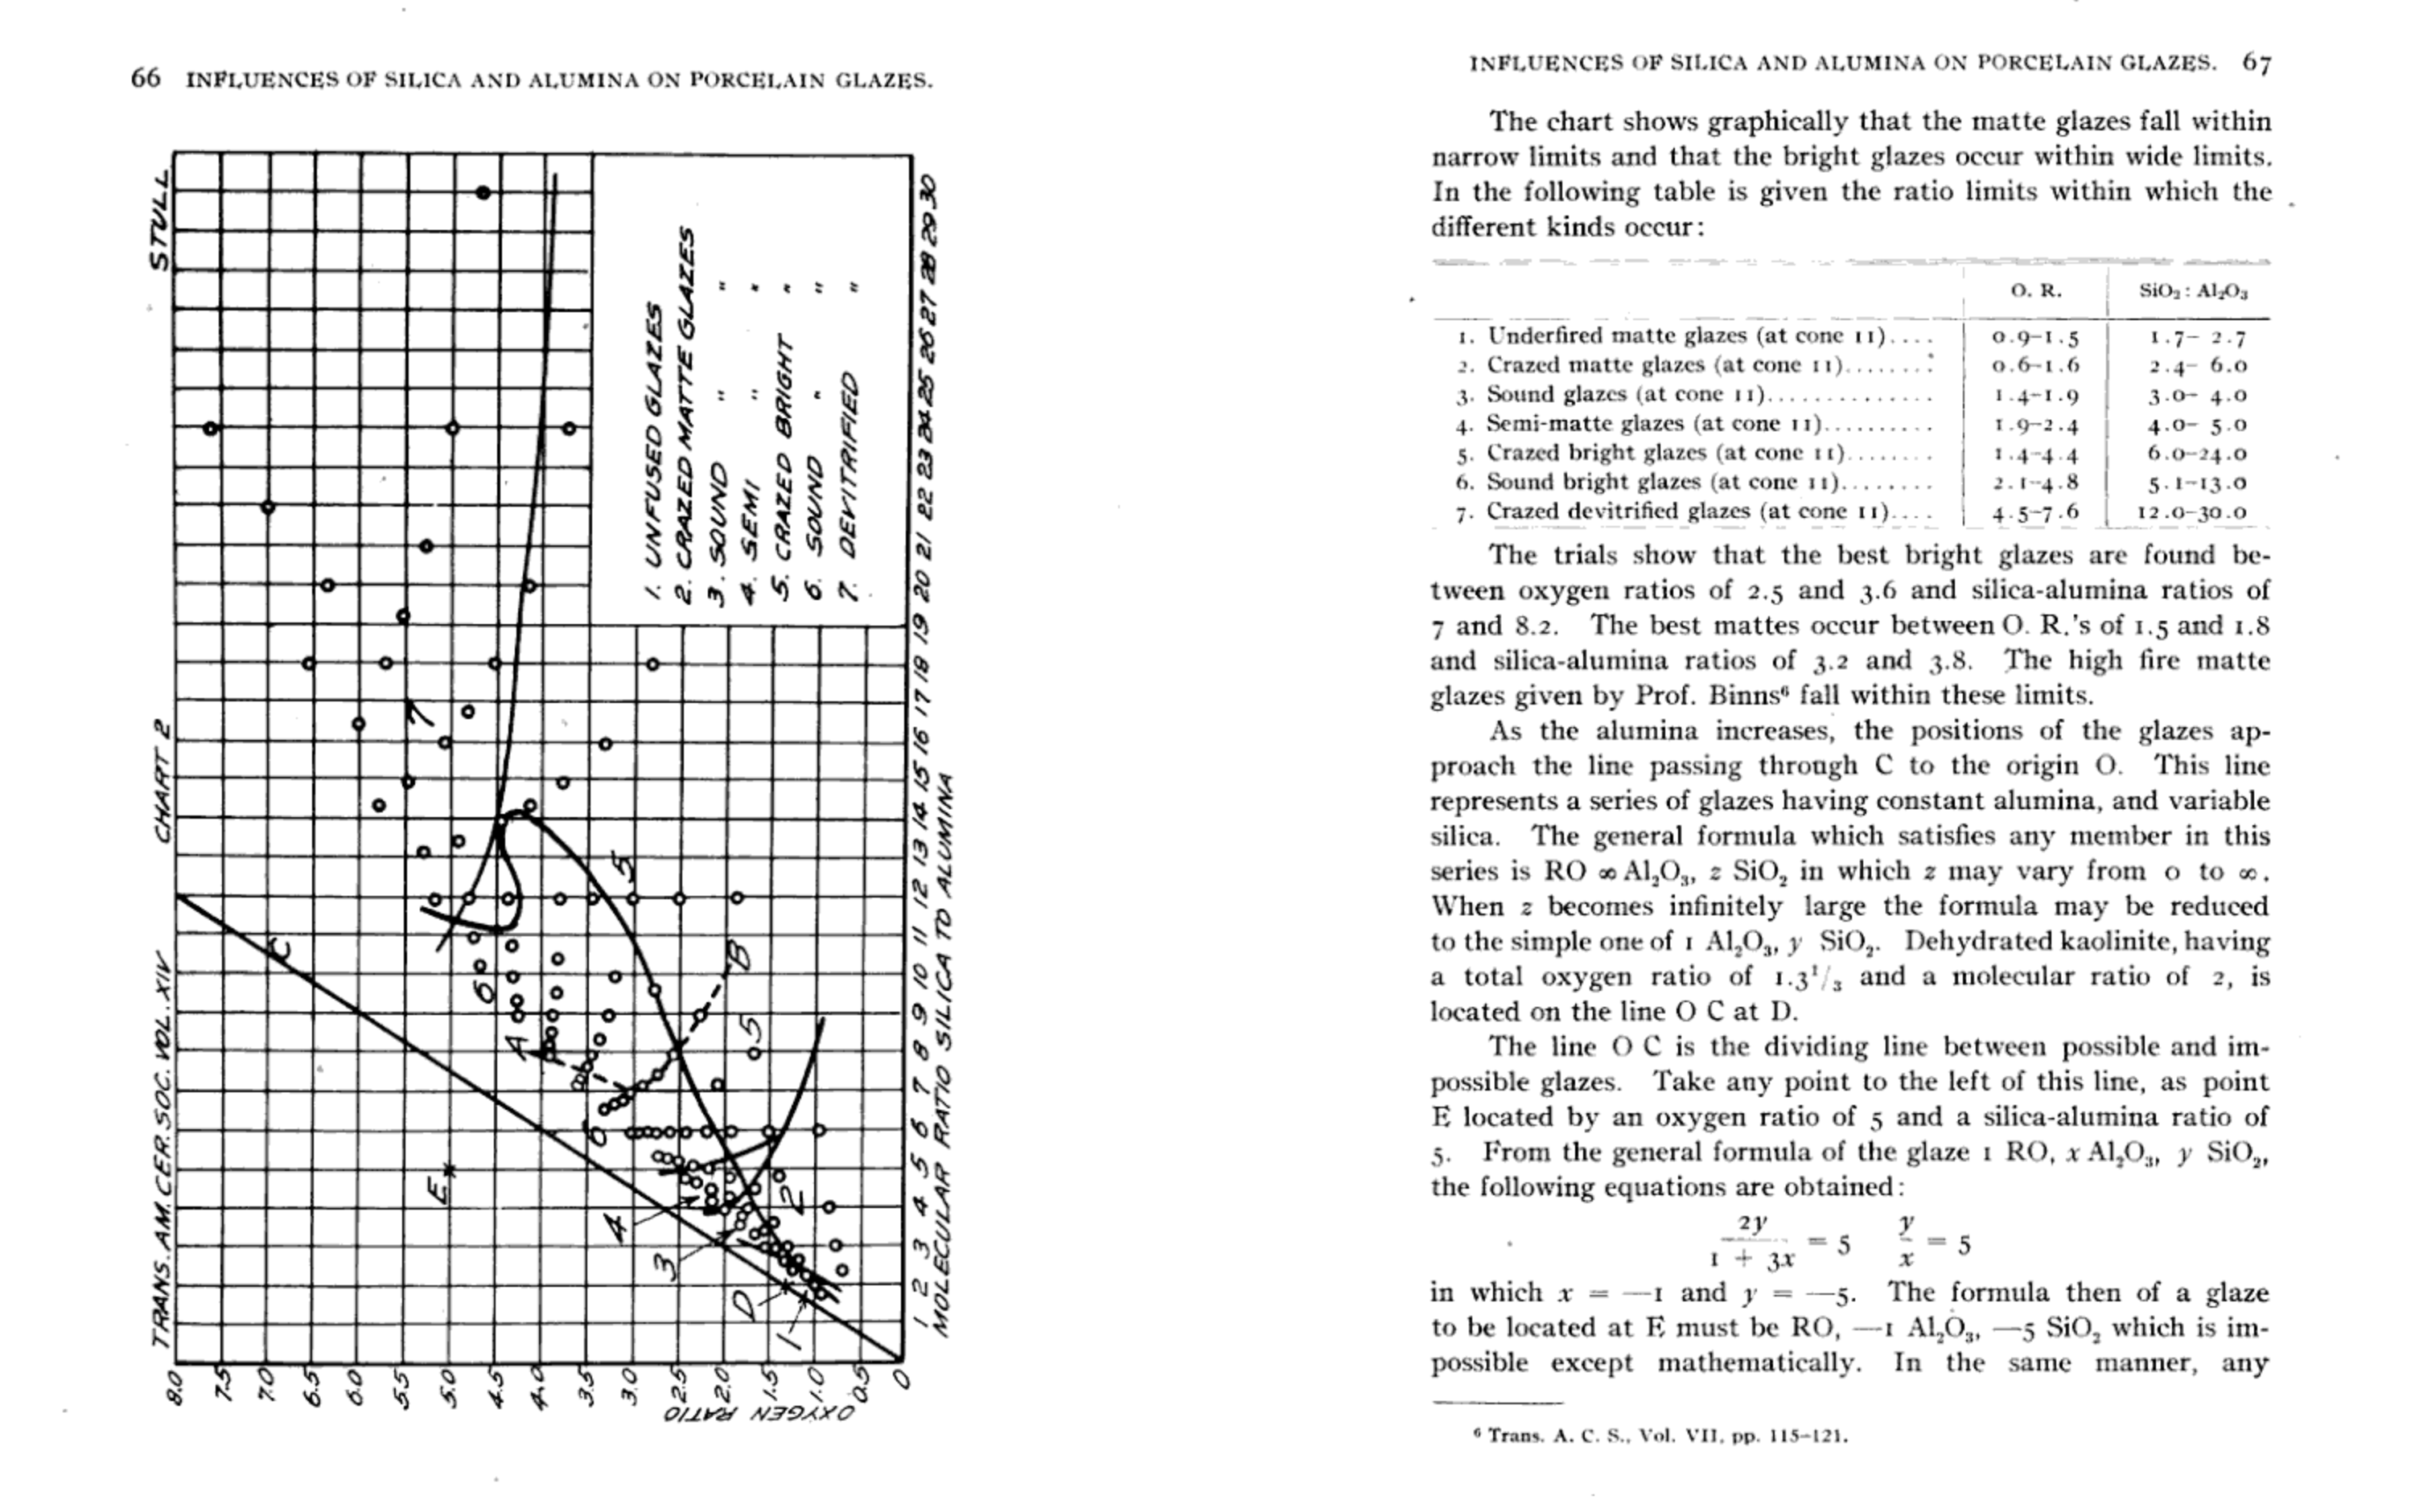
Who knew there was a Chart 2 to his research

If anybody can help me understand what total oxygen ratios are that would be great. I am guessing it is the ratio of oxygen to everything else but how do you work that out? Still lost in what a true matte glaze is. It seems to be crystals in a glassy matrix but when does that go to far to be unusable or no longer classified as a true matte. What if all the crystals are on the surface? There's probably no right answer.
1 hour ago, Bill Kielb said:Yes lots of generalities around clay often don’t always hold up in all cases but being extra careful not a bad thing I suppose. Stull drew his map and did his research prox.. 1912 so maybe he indirectly inspired Currie. RT Stull was the head of the ceramics engineering department at the University of Illinois - my home state.
It does seem like Stull was blending long before Currie as he says "The glazes in that portion of the field covered by the A to H series were made by blending the four extremes according to their combining weights."
Credit to Glazy for these images - https://wiki.glazy.org/t/influences-of-variable-silica-and-alumina-on-porcelain-glazes/index.html
I have rotated chart 2 and will attach at the end for easier viewing.

-
Thank you for the link to her presentation, I will watch that today.
I am not sure stull's research was as popular back then but looking at Ian Currie's method it is the same idea. Vary Silica and Alumina while keeping flux the same relative to each other and he was a big inspiration for the test.
Edit: Very interesting results in that video, particularly around B2O3 and cone04 glazes leaching a lot less copper than cone10 glazes and matte glazes leaching less than gloss. Funny that they used Lucideon for testing, I have tried and failed a few times to get a job working there.
-
Maybe nonfunctional is not the right word but I have found for the surface to look matte is has to be rough to scatter the light in different directions. It doesn't mean they wont function as a glaze it is just something to keep in mind and what many of us will classify as nonfunctional.
Here's and experiment where I tried looking into Silica:Alumina ratios while trying to keep fluxes the same. Depending how much testing you want to do this kind of work can be great for finding the surface you desire. Looking at the tile you probably want to be in the range 5.5:1 - 6.5:1 Silica:Alumina. @Bill Kielb it's interesting that you are way down at 4.34:1 and still getting some gloss!
I have found the surface quality has a lot more to do with that ratio than what fluxes you use. In this test I used as many different flux as I could, each flux does bring it's own qualities to the surface but it is a lot less than siilica and alumina.
The way these tiles work is you make up the 4 corner glazes and blend different volumes of each together to get the whole range of tests. Glaze A is the top left square, B the top right square, C the bottom left square and D the bottom right square. The glaze is probably 3-4 times thicker than it would be on a pot and I did fire to cone9 so keep that in mind as a thinner layer will show more clay underneath.
I am glad the forum keeps a record of my 7 year old tests as I have long forgotten what exactly happened.


-
When I mixed up the slip from raw materials it sat around for a month or maybe even two without these little crystals appearing. It wasn't until I was running low that I recycled all my dry slip back into the left overs that I got these a few days after mixing.
I don't even really need the wollastonite, there just seemed to be a slight decrease in porosity adding a little to the recipe. The one I have been using is B0118 but I could take it out and only use Nepheline Syenite. I don't actually have a test with no Wollastonite but looking at the porosity it should still be below 0.5%.

-
I tried dissolving the crystals in hot water and they didn't dissolve at all. Could it be some kind of Calcium Silicate maybe? Tried to search for a test to confirm that but nothing really simple seems to come up on google.
Maybe I could try a flame test if I can source some hydrochloric acid. I don't have any platinum wire but I do have nichrome wire. Probably a waste of time as I am pretty sure it's calcium related and the nichrome wire gives an orange colour too.
-
Good idea to sieve and see what they look like, dunno why I didn't think to do that in the first place
seems obvious now you say it. There's only a tiny bit of boron in the frit, much more alkaline frit.
First off it went though a 60 mesh sieve and.... hardly anything left on the sieve. Very odd.

Now I thought they looked way bigger than 60 mesh but just to be sure I put it through 100 mesh and ended up with a sandy looking substance.

Hard to tell any shape so I got a few snaps with my microscope, there's the odd black coloured piece but most are clear and white. Looks to be some long crystals and then lots of blob shaped ones. I will let them dry out over night and see if they dissolve tomorrow.


-
8 hours ago, Min said:
Which recipe are these from?
Here is the recipe, added the frit chemistry too.

-
Having some strange results with my slip today. The first batch sat around for over a month and nothing crystalised out. I had a little left over and recycled all my dry slip into that a few days ago.
Added enough water but no extra sodium silicate as the viscosity/sg were all good. The first casts were fine with no lumps but today I noticed these weird spots after I casting and on pouring out the slip I have tiny lumps everywhere. A little confusing when there was no issues with the fresh batch. It was sieved after recycling the dry slip and no issue using the next day but a few days later I have this problem.
Any ideas? I don't think it's any colder in the studio now than Dec/Jan, could being warmer get stuff to crystalise out?


-
The first photo doesn't look glazed to me.
Mostly reminds me of glazes called 'oatmeal' here in the UK.
Looking through the instagrams I feel they are half melted glaze and not very functional but that's the only way you can get that look. I wouldn't expect them to hold up well to use as the surface will be very rough and stain easily.
-
I wonder if you could get something similar with a kind of mocha diffusion slip although it does spread a lot in the work I have seen. Another idea could be paining onto glaze instead of onto the clay, that might give you more spread.
-
If I remember right it's 2 x internal height + half internal length. Not sure it holds up for kiln conversions, I tried a chimney around that size and it didn't seem to do much.
Had a look in the kiln book and he says for natural draft kilns 3 x downward pull + 1/3 x horizontal pull so I hadn't remembered quite right.
-
9 hours ago, Locosan said:
I don't have any camera that takes pics of 1mb and I'm not sure the pic would be clear enough if made that small either........hmmm?
There's a few ways you can make file size smaller without actually changing the size of an image. Different file types like .png .jpg .gif .webp all work in different ways and would give you different file sizes for the same image.
You can also change how many pixels per inch are in the image, the camera is probably around 300ppi but somewhere around 72ppi is suitable for the internet and it means there's a lot less data in the file.
When exporting images in photo editing software you can also specify how much compression you want further reducing the file size.
It all gets a bit complicated but if you go to https://cloudconvert.com
click 'select file' and choose the image you want to resize
change the 'convert to' dropdown so that you have webp selected (it doesn't have to be webp you can also stick with jpeg but the compression is a lot easier to see)
click the spanner icon and find where it says 'Quality' and input 60 into the box then click ok
Now click convert and download your image, if it is still too big reduce the number you enter into the quality box. You can go as low as 1 without being able to see much difference but your file size will be way way smaller.
Hope this helps.
-
Had a look through my microscope at the glazes. The low expansion has smaller and fewer bubbles.
I did read on digital fire about holding on the way up and on the way down to reduce micro bubbles so I may try that next time and see if it actually reduces the bubbles. My guess is it wont from past experience but always worth trying.
Interesting that the purpleish stain seems to reduce the bubbles even more (or maybe the stain hides them) and the blueish stain makes the surface look a bit devitrified and must be more refractory. Going to do some experiments colouring slip instead so I shouldn't have much variation in the finished glaze surface and need a different glaze recipe for different colours.
Low

Lowest


- Hulk and Kelly in AK
-
 2
2
-
I am very happy with the results so far
 especially after being educated in cone 6-10 and thinking that's the only way to get functional/vitreous ware for a long time.
Glaze needs some more testing to make sure it's durable and resistant enough but I can't see any problems with the low bisque. Having a quick look at the cone04 limits I seem at the higher end of Silica and Alumina and hopefully a good sign.
They are all a bit thinner than I would make functional ware so the extra thickness could cause issues burning things out. It seems mostly related to Lignite so maybe there just isn't much in this Dorset ball clay to cause problems.
It would be great to develop it into a throwing body too. Adding bentonite could mess with the porosity so more testing needed for that.
-
Ran a few glaze tests with the low and lowest expansion glazes from a few posts above, I also tried dropping the clay by 10% and increasing frit and petalite but they settled out within 30 min and didn't leave a nice layer on the bisque so that wasn't a good idea.
Can't see much visual difference in the surface between the low and lowest expansion glazes, need to crack out the microscope and have a closer look but I feel the low expansion is better as I don't need the talc or zinc.
I was also interested in how quickly my kiln dropped in temperature from 1100c. The first 100c dropped in 12 min, the second 100c dropped in 15 min and the third 100c dropped in 20 min. Pretty quick but it's a small kiln with a not so great lid.
Low: left has two dips of one second and right two dips of three seconds. Same for all the photos.

Lowest:

Also tried a few glaze/body stains at 3% and 7%, in the low expansion glaze. They advise sieving the glaze after adding colour but I neglected to do that to see how bad it would be. I have an orange stain too but ran out of space to attach more photos on this post and it was my least favourite.


-
I didn't realise you are bridging the contacts to bypass and get a reading. I am surprised it would read room temperature as from the mV type K table 0 volts should be 0 celsius. Maybe I am missing a bit of the equation and it automatically puts 0 volts as the reference junction temperature reading.
Hopefully it is just a wiring issue and not too difficult to fix.
-
Ah yes I had never really compared the two but seeing the photo now the angles are much sharper.
-
This doesn't sound like a fun problem to solve
 I would be interested if you still had all the old thermocouples to try swapping them around and see if any of them get the kiln working again as it sounds like a really weird problem. They don't seem to exactly be broken if you can get it to read room temperature in the bypass.
-
I wasn't planning on testing a hotter bisque unless I get some issues further down the line.
There''s no exact data on the melting point I can find online other than it has a firing range 860-1060C. (1580-1940f)
Not sure if that means 860 is the melting point as I assume they are specifying when it's a usable glaze. I will add some pure frit to the next bisque to see if they are melting or not.
Are they doing a hard angle with the coils still intact or more like a front loader with what we call hairpins where the element is unwound in the middle? I had a job winding kiln elements for a while, mostly for skutt kilns and they had a similar diagonal across the brick.
-
Finally got around to trying a bisque firing
thought I would try 800c (1472f) first and go hotter if needed but seems to have gone pretty well. They sound like bisque, have to wait and see how they go in glaze application. Haven't got any cones that low so not sure what cone I managed.

I always used to do 100c/h for a bisque but this time I was up around 230-250c/h with no problems, a little hold at 100c just incase. Total firing time is 4 hours. Seems like I didn't have to be so cautious previously.
Here's the graph of the firing.

-
You can certainly melt glazes in there as the flux used to recover precious metals is like 75% Soda Ash and 25% silica sand, a very basic glaze to dissolve all the sulphides. Not sure the clay would survive unless it is already bisque fired slowly in another kiln.
-
On 12/20/2022 at 2:11 PM, Hulk said:
Looks like 1300 °C is well over Cone 10, excepting particularly (very) "fast" heating rates...
I would say in the UK 1300c and cone 10 and are pretty much interchangeable even if most kilns wont manage 150c/h for the last 40 min of the firing up to 1300c.
On 12/19/2022 at 3:10 PM, Ceramics.np.04 said:
I would test what voltage you have in the studio over a few days and get the elements made for that voltage. The UK is supposedly 230v but I get 245V at my house so any elements designed on 230v will draw more power on 245v. Would be worse the other way around running 240v elements on 230v as then you will be down on power.
Just realised it is a front loader which tend to be more complicated than top loaders. Just a guess at the elements inside being 4 in the side walls and two in the floor. The side wall elements may all be the same spec but the floor will possibly be different.
Need to know the length of the tails (probably double what they are now so you have extra to play with/cut off, maybe 9-12") what length each bit of element is in the wall and how long each hairpin is. Also need to know what gauge the wire is, the internal diameter of the coil (maybe 1/2 or 3/4") and how they elements are wired up. Once you know how they are wired up we could possibly figure out what resistance they should be.
A bad drawing to maybe help.

- Ceramics.np.04 and Chilly
-
2
-
Turns out I was trying to mix to a sg of 2.1 doing 100g water to 300g dry and needed more like 140-150g water for 300g dry ingredients. Starting off with 0.2% weight of the dry ingredients in Sodium Silicate and then adding a little more. Need to try out some Sodium Carbonate solution too and see if that helps.
Ran some tests with the Kaolin I have and they are all pretty porous using similar amounts to the ball clay. Also tried swapping Nepheline Syenite for Soda Feldspar.
Did a few tests on B0118 and it went from 0.08 - 0.44% absorption. For some reason the thin slip test tiles had higher absorption than the little slip cast glaze tower but all under 0.5%.

Mixed up 4 different glaze tests to try and poured some onto plaster. Not really glazed, more a 1g lump of glaze melted so they are all pretty thick. Opened the kiln at 200c because I figured that should be similar to a boiling/freezing test with little effort. No bisque firing so once the glaze had dried I placed onto bone dry slip.

Lowest

Low

Medium

High

The high has crazed a lot, the medium has a cracks on each side and the other two don't have any crazing. The clay already had the cracks from drying as I am just pouring slip onto plaster.
Lots of different bubbles

Total shrinkage is 10%, test bars went from 100mm wet to 94mm dry and 90mm fired. Here's the unglazed fired clay.


 I would be interested if you still had all the old thermocouples to try swapping them around and see if any of them get the kiln working again as it sounds like a really weird problem. They don't seem to exactly be broken if you can get it to read room temperature in the bypass.


Kilns and Furnaces FL80 firing issue
in Equipment Use and Repair
Posted
It is a front loader and the ones I have seen are split into a separate circuit for each side wall and one for the floor so I assume each pole is switching one of those circuits.