


Michael G Parry-Thomas
-
Posts
4 -
Joined
-
Last visited
Content Type
Profiles
Forums
Gallery
Posts posted by Michael G Parry-Thomas
-
-
I designed this clay extruder to be flexible and easy-to-use it can be used on a tabletopfeatures:-Hydraulic assisted (hydraulic jack is used to make the clay extrusion easy.Main clay chamber can be converted easily to accommodate small dies.With a simple adjustment on the plunger will allows you to have a smaller clay chamber. I like to think of this as a clay saver because you are not filling the large chamber full of clay for a small die.I designed a small easy-to-use adapter to allow smaller dies, the adapter slides into the main clay chamber. It is easy to change over from the main chamber to the smaller chamber.Larger die, I made an attachment which fits in the bottom of the main chamber this increases the diameter allowing you to use larger dies The main purpose of designing this system was to make it flexible and most of all easy to use. On the hydraulic side there is a sliding mechanism which helps to transfer maximum pressure evenly across the clay being extruded. The whole of this project was printed in 3d this allowed me to test and find the best way to achieve an adaptable easy-to-use extruder.The finished project was a combination of stainless steel and 3D printed components

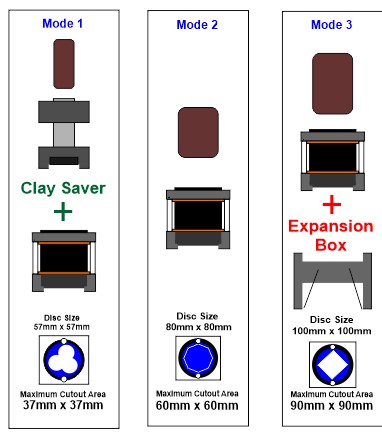 I designed this clay extruder to be flexible and easy-to-use it can be used on a tabletopfeatures:-Hydraulic assisted (hydraulic jack is used to make the clay extrusion easy.Main clay chamber can be converted easily to accommodate small dies.With a simple adjustment on the plunger will allows you to have a smaller clay chamber. I like to think of this as a clay saver because you are not filling the large chamber full of clay for a small die.I designed a small easy-to-use adapter to allow smaller dies, the adapter slides into the main clay chamber. It is easy to change over from the main chamber to the smaller chamber.Larger die, I made an attachment which fits in the bottom of the main chamber this increases the diameter allowing you to use larger dies The main purpose of designing this system was to make it flexible and most of all easy to use. On the hydraulic side there is a sliding mechanism which helps to transfer maximum pressure evenly across the clay being extruded. The whole of this project was printed in 3d this allowed me to test and find the best way to achieve an adaptable easy-to-use extruder.The finished project was a combination of stainless steel and 3D printed componentsMain clay cylinder Is made from a piece of durable Heavy duty long lasting piping2 Orange locating rings .There are stainless steel locating pins which secure the cylinder to the base boardBelow the base board you can attach the expansion box to the stainless steel pinswhich are easily fixed in place with wing nutsinsMetalworkSteel tubing throughout painted with rust presenter Zink coating with Matt black paintRed paint has been applied to the main plunger Connecting fittingsstainless steel bearings and shaft stainless steel link pins with stainless steel locking collarsgalvanised fittings have also been used in this projectOne mounting board which slides into the steel metal frame for easy removal and cleaningAs with any extruder use soft clay .Using hard clay on any extruder may damage your equipmentalways make sure the clay you use is suitable for the type of extruder you useAfter making this extruder I decided to make a clay hardness instrument toolPlease go back to the main menu and click on the link clay hardness tool for more information

-
This type of viscosity instrument is used in many different types of industries . the ceramic industry for measuring casting slips and glazes. Onglaze colours for the silk screen printing industry,
4 hours ago, Min said:Is the main use for this measuring viscosity of casting slips?
-
Hi
I have made a Torsional Viscometer
I wanted something where I could measure the viscosity using a laboratory instrument as with anything like this t.ype of equipment can be very expensiveI decided to use my 3D printer to make a fully working Torsional viscometer. The viscometer is very accurate and every part can be replaced and upgraded.Parts not printed consist of :-Purchased from eBay1. Stainless steel shaft.1. Perspex tube.1. Flywheel Top stainless Stainless steel disc.1. Sample cup small stainless steel disc.1. Small disc in the base.Thumb screws bolts. (Brass - stainless steel)1. 30swg torsion viscometer wire (This has been made in house - wire ends are designed to be reused)Printed parts:-2. Support brackets ..................... (Hold the Perspex wire guard tube)1. Scale gauge bracket ................ (Hold the printed vinyl scale)1. Sample holder bracket ............. (Allows the sample to be held in position)1. Sample stop .............................. (This stop allows you to set the sample bracket height)1. Main base .................................. (The main base has 3 micro adjustable levelling)1.wire holder .................................. (Special wire holder bracket with micro adjustment)1.Adapter ring ................................ (This was added so you could use a commercial spring wire)1.Sliding centring wire guard ........ (This allows you to slide section of the wire guard to assist in levelling)1.Flywheel ...................................... (Customisable can add stainless steel weight discs, brass locking screw for securing bobs)1.Flywheel locking mechanism ...... (Fully adjustable indicator pointer locking holder)2.Accessory trays .......................... (designed to locate on the side of the main base to store any Allen keys and also bobs1.Waterproof vinyl gauge............... (can also be used with removable logging dial)I decided to build a 3D printed Torsion Viscometer to do some experiments with my hobby pottery glazes. I designed each part in Design Spark Mechanical CAD software . For the vertical frame. I used copper tubing as I had this lying around in a scrap bin. (This has been replaced with a stainless steel round bar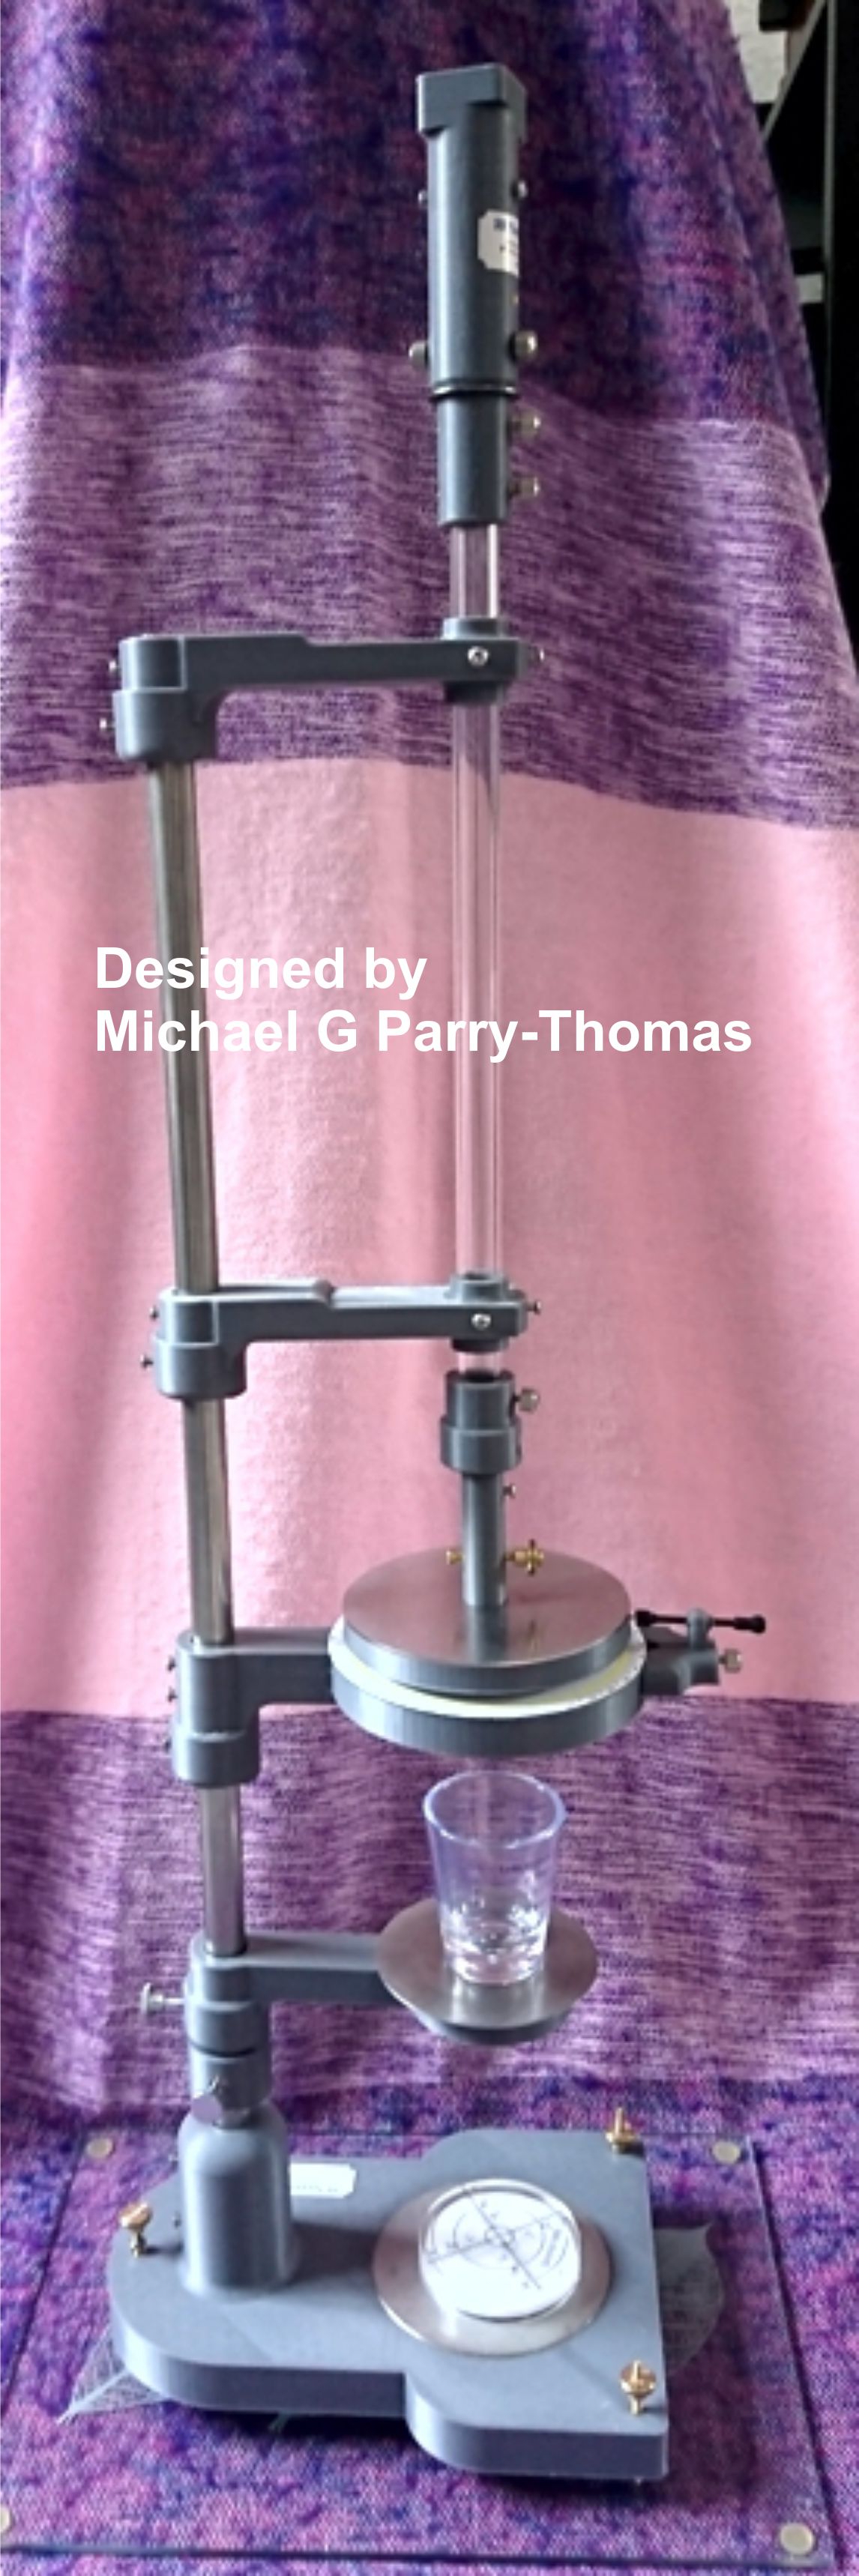


Home made clay extrusion
in Equipment Use and Repair
Posted · Edited by Michael G Parry-Thomas
Hi everybody
Tried out some commercial available hollow dies in the small clay saver
They are well made the hollow clay tubes came out amazing.
When I made this extruder no welding was used
It all bolted together ,
I have made a small alteration the ball joint socket has been extended and is fixed in place with some bolts
I will draw up some plans on how to make this extruder some time next year,
Mick