

Hyn Patty
-
Posts
245 -
Joined
-
Last visited
Content Type
Profiles
Forums
Gallery
Everything posted by Hyn Patty
-

Currently in my Studio...
Hyn Patty replied to Hyn Patty's topic in Studio Operations and Making Work
And if anyone cares, here are the last two pieces finally completed and ready to ship to their owners. Quite a joy to work on them but what a PITA to photograph and edit/color balance to try and get the images to look like the colors on the pieces! The photos do not do them justice, IMO.

-
Wait, you /only/ bisque fired to cone 08? That's a pretty low fire to bisque even earthenware. So of course we want to know what clay you are using. Even earthenware usually bisques to at least cone 06 and better if at 04. So that is a possible issue even before you added your underglaze and clear glaze if you aren't bisque firing to maturity first. Definitely sounds like you are underfiring but we need more information.
-
Currently in my Studio...
Hyn Patty replied to Hyn Patty's topic in Studio Operations and Making Work
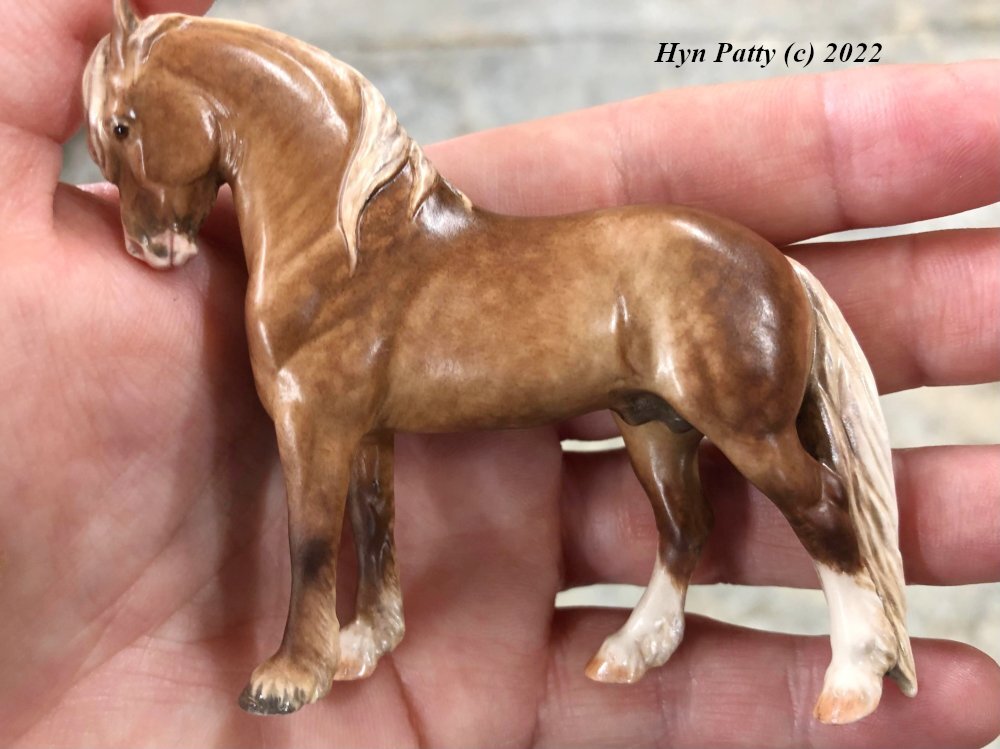
The dappled Buckskin 'Daffyd' Welsh Cob is almost ready for his clear glaze but is set aside while I bring this piece along. This is 'Otto', a snotty Shetland pony stallion also sculpted by Sarah Minkiewicz-Breunig and also produced in earthenware ceramic bisque many years ago by Pour Horse Pottery. This piece is also a custom order commission for a client. Shown in progress, I am working the second layer of under glaze here. When he's clear glazed the colors will be much richer and darker. The color is dark liver chestnut minimal tobiano with flaxen mane and tail. He stands 6 " tall by 6.5 inches long. Lots more about these pieces on my Facebook page.

-
Thank you - about what I've found so far in my research as well. The ones that were used with presses appear a lot like outdoor flower pots - modestly thick walled. The French designs particularly tend to have just a few holes lined up the sides and holes in the bottom for draining the whey. My favorites have more holes but smaller. Again, like you, judging from antique examples. Seems the clay types ranged anywhere from glazed terracotta to stoneware but I haven't found any made of porcelain except for modern examples - which are few and far between. Based on that, I did inspire a couple of potter friends to try making some to test. I will also try making a plaster mold to slip cast my own and see what comes of it. Just a little side project that seems like it might be interesting and quite different from my more usual work.
-
All right, a strange question here because I'm not finding anything in searches on this group. I'm interested in home cheese making and traditionally molds were often made of wood or ceramics. If you ever do home cheese making you know the plastic molds for hard cheeses that have to be able to go under a press and under a 100lbs or so of pressure have to be strong. They can't be flimsy, and even buying them in heavy duty plastics isn't cheap. Or you can make your own - but they are ugly. They also need to be easy to clean and food safe. So I looked up making old fashioned cheese molds using ceramics like stoneware and porcelain - glazed or unglazed. Now I'm not a potter who uses a wheel to throw. Love to do that some day but I'm a sculptor who makes molds and does slip casting. I'd like to know if any of you have made cheese molds before? Have you actually /used/ them yourself or know people who do, with more than 50 lbs pressure.? If anyone here has made cheese molds, or knows a good website about making them, I'd love to know. I've found a few websites about making them but not as much as I'd like. Thanks!
-
Also, you can purchase frits to add to high fire porcelains to lower the vitrification to a lower cone. Fritts aren't cheap but you add only a little bit.
-
Currently in my Studio...
Hyn Patty replied to Hyn Patty's topic in Studio Operations and Making Work
I won't post a lot more to this thread because I will be putting up a lot of this on my upcoming Patreon page but I thought giving an intro to what kind of ceramics work I do might be nice. I can always add more later when I'm mold making and casting my own sculptures this summer. For now, getting one of my larger sculptures 3D scanned so I can reduce the size for printing a reworked resin for making a master rubber mold from which I can pour my plaster production molds for slip casting.- 25 replies
-
- 1
-

-
- underglaze
- china paint
- (and 7 more)
-
Currently in my Studio...
Hyn Patty replied to Hyn Patty's topic in Studio Operations and Making Work
Still working the initial raw under glaze layer on this 'Daffyd' Welsh Cob bisque. About three different colors airbrushed in layers. At this point I'm ready to double check all the white markings are crisp, clean, detailed, and refine the dapples a bit more. Then he'll be ready to fire at cone 04 to set this layer. I'll start painting details like the eyes, wrinkles, hooves, add a transparent golden layer to help 'sink' and soften the dappling, then darken the mane and tail for the next under glaze firing...

- 25 replies
-
- 1
-
-
- underglaze
- china paint
- (and 7 more)
-
Currently in my Studio...
Hyn Patty replied to Hyn Patty's topic in Studio Operations and Making Work
So, keeping with the whole 'what is going on in my studio' thing, I've started work on a couple more pieces with underglazes. This one is a medium sized piece that will be a dappled buckskin. here I've masked off the white markings and am very carefully starting to dapple his coat pattern in softly using a lifting technique. The raw, unfired underglaze after airbrushing is very delicate and easy to scuff, scratch, or lift and I'm using that to my advantage. I don't really have to worry too much about rubbing through too many layers either. Because I also have transparent underglazes so I can over spray this layer with additional layers. That will soften and sink the dappling into the coat and become very, very life like. This sort of technique could just as easily be pushed on pottery or other forms of sculpture. It need not be horses, or realistic at all. It could be using bright colors, fantasy made up patterns that evolve into other patterns, textures, and in later firings incorporate any number of other materials in lower firing ranges yet. Metals, lusters, etc. This piece is around 7.5 inches long. Earthenware ceramic that was ball milled very fine with talc added for a very dense, finely detailed slip. I'll post more images of this piece as he progesses over time. Custom order for a client.
- 25 replies
-
- 1
-
-
- underglaze
- china paint
- (and 7 more)
-
I also have significant allergies to molds and mildews. Serious allergies to it. Break out in hives and worse - but only to certain kinds. I've never, ever had any problems with the kinds of molds that grow on clay. Not yet. So I think it really depends on the person and what kind of molds you personally have issues with - as the others have also noted. I think it's also worth noting the PH of pottery clays vs the PH of other things molds /usually/ grow on which very often have low PH. They generate very different kinds of molds due to that one simple factor and what the mold or mildew actually feeds on.
-

From the album: Hyn Patty LLC
This is 'Otto' a beloved pony sculpture done by Sarah Minkiewicz-Breunig and produced years ago in earthenware ceramic by Pour Horse Pottery. This bisque was sent to me by a client who wants him custom glazed to a dark liver chestnut with flaxen mane and tail, no dappling. He has a minimal tobiano pinto pattern that I have masked off with latex. In this photo I have just airbrushed the raw, unfired under glaze on in a few layers of different colors. Then removed the latex. Now he's ready for me to fine detail the edges of the white and clean up some of the overspray elsewhere. Once I am satisfied he's as tidy as can be, I'll fire the under glaze layer at cone 04 to set it. Then I can proceed with more detailing and additional layers. This piece stands about 6 inches tall by 7 inches long.© 2022
-
Preciosia Mane - Claybody Work to Bisque
Hyn Patty posted a gallery image in Browse Member Galleries

From the album: Hyn Patty LLC
Here is an already bisque fired English fine bone china sculpture. I am clay body customizing it to add a Spanish double braided mane with tassels, shown here roughed in but without details yet refined. Read more about this process in my thread here (scroll down):© 2022
-
Currently in my Studio...
Hyn Patty replied to Hyn Patty's topic in Studio Operations and Making Work
By the way Pyewackette, I also do work MUCH smaller, less than 1 inch tall. Talk about hard on the eyes to do such itty bitty detailing. Let me just say that investing in a good, well lit, magnifying lamp is a must. But I also use my phone to take photos zoomed way in up close so I can study what still needs work. Much less eye strain that way!- 25 replies
-
- 1
-
-
- underglaze
- china paint
- (and 7 more)
-
Currently in my Studio...
Hyn Patty replied to Hyn Patty's topic in Studio Operations and Making Work
So for something completely different, here is an English fine bone china bisque of a sculpture called 'Preciosia' of an Andalusian mare by Brigitte Eberl of Germany. Produced by the Horse Gallery of Horsing Around in England for a 50 piece edition. Lovely piece! Stands about 7 inches tall or a bit less and about 9 inches long. My client purchased this bisque from me after that edition was already long sold out. We worked out having me change it from a mare to a gelding and adding a Spanish double braided mane and tassels. Here it is shown in the greenware stage where I have been adding earthenware clay (finely ball milled and with talc added) to the neck. It's a LOT more complicated than just adding wet clay. I have to use bisque mender to help bind it, rough up the original bone china to give it plenty of grippy toothy surface, and fill in a lot of cracks as it dries and shrinks at every stage. I've gotten to the point where I can now sculpt in refined details to show the direction of the hair in the braids, and refine the tassels to have beads in them, etc. There's also a big multi-layered tassel I'm adding to the top of the tail, and boy bits underneath, and shoes to be added to the back hooves since this isn't a mare. All sorts of details that need to be correct for this breed's presentation and the sex of the horse. Once this is bisque fired at cone 04, I'll go back in and fill in any additional cracks. It /has/ to be rock solid so there is no possible risk that the added clay can crack and fall off. Fine bone china and earthenware also have differing co-efficiencies (expansion and contraction rates) so there is a lot of thought that has to go into it. I have pieces in private collections that are going on 20 years old that have never cracked once finished so I know it can stand the test of time. When done, I can move onto under glazing, then clear glazing, and finally china painting and other low firing to finish the many details. This one is destined to be a lightly dappled buckskin Lusitano when completed.


-
Currently in my Studio...
Hyn Patty replied to Hyn Patty's topic in Studio Operations and Making Work
Bless you, Denice! Yes, keep going and black porcelain is awesome. Love it. You can really do SO MUCH with textures and polishes that can push that medium into many subtleties. When I get my bone china bisques from England, that I am working towards producing in studio for myself now, I often have lots of clean up on them. Missed seams, pin holes, even sometimes broken pieces - and I just repair and clean them up. Sand paper, bisque mender, dremel tools. You understand. You should post photos of your black porcelain pieces! I've also pushed into new ground with resculpting of bisques - like removing manes and tails, changing ears or mane and tail styles. I'm working on a lovely Andalusian mare right now that I am changing into a gelding with a double braided mane with Spanish tassels added for a client. The sculpture is English fine bone china but the added mane and tail, and boy bits, are all added in earthenware. Pretty tricky adding new clay to an already fired bisque of another material entirely but I have developed my own tricks that work and have held up for decades, even with the co-efficiency issues in the materials. I should post a photo. But if it's not done just right, pieces will flake, crack, and come off! Mind you, this isn't altering unfired greenware, this has evolved out of repairing broken bisques. Some of these bisques are really valuable and may cost $1,000 or more and be non-replaceable from long sold out limited editions. So my being able to restore them in the kiln and still custom glaze them for my clients is really thrilling. But it all started with simple clean up of bisqueware that wasn't perfect. I'm a perfectionist so it drives me crazy if there is some little flaw. I don't accept that and keep pushing myself to figure out how to make things better. It doesn't always work!- 25 replies
-
- 1
-
-
- underglaze
- china paint
- (and 7 more)
-
Currently in my Studio...
Hyn Patty replied to Hyn Patty's topic in Studio Operations and Making Work
Oh my goodness, do /not/ be intimidated! When if first started doing this I was in AWE of the great artists who did this kind of work. It does take years and years of practice to get really good at it on an international level but honestly, I wouldn't hesitate to help anyone work towards something like this if you wanted to learn. People were hugely generous to share their skills with me, a little at a time, and I pushed and tried things on my own until I developed my own skill set and my own techniques that work for me. It sets my work apart from everyone else's. But I started with zero and had a steep learning curve. ANYONE who wants to learn something though can put the time and effort into it, will reap rewards in time. It does take a lot of self motivation to do research and put in the time to practice, and be willing to seek out those in any given field who are good in it and ASK questions. So the non-self motivated get weeded out, but those who are determined and patient can totally learn how to do this kind of work if that's what you are interested in. And it doesn't have to be horses - it could be anything. Even using these techniques on thrown pottery. Also glad to hear you are doing better! That was a real low point in my life and we are having hard times right now too with my husband out of work. But again, if you are tenacious and don't give up, you can sometimes pull yourself back up. You got this!- 25 replies
-
- 1
-
-
- underglaze
- china paint
- (and 7 more)
-
Currently in my Studio...
Hyn Patty replied to Hyn Patty's topic in Studio Operations and Making Work
Thank you very much for your kind words, all of you. I got Lyme Disease and also T-boned on my motorcycle so my art studio was closed for about a decade while I dealt with everything. Had to learn how to walk again, long term treatments for Lyme, etc. It really derailed me. We also lost our home and everything was put into storage for many years. Now I have a studio again (a corner in our basement) I have been slowly getting things back up and rolling the past couple of years. I've had to replace a lot of equipment I used to have for casting resins and ceramics but everything is slowly progressing. It's good to be back in the saddle so to speak. The last major thing I'm working on getting back on top of now is molding and casting my own sculptures. I was doing that years ago before everything got derailed but I have to relearn some of the skills I haven't used in a decade. My originals are usually oil clay over wire but I am also learning how to use Zbrush and have a 3D printer so things are apt to get very interesting once I get a handle on the tech. Lastly, I have researched heavily into ceramics 3d printers. Form Labs had one I was keenly interested in that uses a porcelain resin that you can 3D print in extremely fine detail and then fire in the kiln. But then they discontinued that model! ARG! It was affordable compared to some high end 3D printers and alas, most 3D printers for ceramics are far from suitable. No detail, all ropey coil built extruders - but the tech is slowly getting there. As I get older and hefting 50 lb plaster molds gets harder to do, I sure will be glad when I can skip that and just print out and assemble my greenware sculptures to fire. Bye bye plaster molds when that day comes! So I'm keeping a close eye on ceramics 3D printer tech as it evolves.- 25 replies
-
- 2
-
-
- underglaze
- china paint
- (and 7 more)
-
Currently in my Studio...
Hyn Patty replied to Hyn Patty's topic in Studio Operations and Making Work
And here are the final photos of the mini 'Hadrian' custom glazed equine ceramic to a rich carmel dark palomino with satin glaze. I think his owner will be very pleased with how well this commission came out. She picks him up this weekend! Thanks for following along and I hope it wasn't too boring. I'll probably play with these final photos a bit more to brighten them up since they are a touch dark.

- 25 replies
-
- 5
-
-
- underglaze
- china paint
- (and 7 more)
-
Currently in my Studio...
Hyn Patty replied to Hyn Patty's topic in Studio Operations and Making Work
While we wait on the mini 'Hadrian' to do his final firing this evening, I'll just toss up photos of another one I just completed and shipped out to his owner. This piece is actually a bit smaller and is a mini Arabian foal sculpted by Donna Chaney of England and while she produces /most/ of her sculptures in fine English bone china, this one is earthenware. Very thin fragile legs and tail! I custom underglazed him to a baby bay with silvery grey leg joints, and high sabino white with a few white patches on his belly and neck. Lots of wrinkles and a little bit of coat texture. Final color and details done lightly in china paints but I didn't need much to finish him.

- 25 replies
-
- 2
-
-
- underglaze
- china paint
- (and 7 more)
-
Currently in my Studio...
Hyn Patty replied to Hyn Patty's topic in Studio Operations and Making Work
If you want to see the lighter golden palomino I did for myself on this same sculpture, or other equine pieces I have custom glazed, I started a gallery here on this group that is located here - only a very tiny selection of the thousands of pieces I have produced: https://community.ceramicartsdaily.org/gallery/album/1543-hyn-patty-llc/ -
Currently in my Studio...
Hyn Patty replied to Hyn Patty's topic in Studio Operations and Making Work
You are too kind, thank you. Horses have been my passion a long, long time. I've worked hard to become one of the best custom glaziers of fine equine ceramics in the world. But there are some others out there who are really good too, especially in England. We are very few and there is rarely more than 3 or 4 of us working in this specialized field in the whole world that get the very top prices for our pieces. So it's a very, very small niche. Here's the boy after the next firing. He's much darker now! All that is left is fine tuning. Shade a bit more around the eyes, push small select areas of dappling darker still by hand rather than airbrushing, push the pinks and grey around the nose a bit more, a little more silvery-gold layers at the bottom of the tail, etc. But he's about done now and the next photos will be of him completed. The last set of photos I'll take for my website will be with a backdrop and without my hands. I'll set up a timed exposure on a tripod with a drop sheet to dim and diffuse light so I get very little reflection from his satin glaze - with a polarized filter as well.
- 25 replies
-
- 3
-
-
- underglaze
- china paint
- (and 7 more)
-
Currently in my Studio...
Hyn Patty replied to Hyn Patty's topic in Studio Operations and Making Work
Yes, I do. Perhaps I can post a photo or two of pieces here that I have sculpted - or at least a link to my website where I have more there. It is located at http://hynpatty.com and if you scroll down past my paintings, the lower rank of horse photos are clickable. The first will take you to my own sculptures (well, a small sample - I've done a lot more than that), the second photo to resins I've painted, and the third page is a collection of my custom glazed ceramics horse pieces mostly sculpted by other people. I am slowly moving away from custom glazing and painting other people's sculptures with a mind to focusing full time on producing primarily my own. Sometimes I have other people produce pieces for me in bone china in England but I am currently working on producing my own made from scratch bone china slip. I already make by own earthenware slips for casting my work. I'll be producing my large draft horse 'Porthos' in ceramics starting later this year once I rework the piece with a loose mane and tail.- 25 replies
-
- 4
-
-
- underglaze
- china paint
- (and 7 more)
-
Currently in my Studio...
Hyn Patty replied to Hyn Patty's topic in Studio Operations and Making Work
And finally, for now, here is another shot of the same piece with the first layer of overglaze (china paints) freshly airbrushed on. This is a darker brown-gold to give him a nice rich coat color and push the darks. Once this layer is cleaned up, using first a dry brush and then a fine pointed damp brush tip to clean the whites especially well, I then put him back into my kiln tonight to fire again. This time at cone 017. Once this layer is set, I will go back and airbrush another overglaze layer of smokey black-brown very softly in some locations. I'll wipe some of that off to bring back some of the dappling stronger, adding yet more depth and value. I fire pieces over and over again building in subtle changes and many details. When this piece is completed, I would normally sell him for about a grand. But as this is a custom order commision for a client, I keep her up to date with step by step photos for her input so I can be sure to make him just exactly what she ordered. I'll post more photos as this piece gets completed. And yes, I DO take many health precautions when airbrushing underglazes, glazes, or overglazes. I wear a respirator, have ventilation set up, and wipe all surfaces down carefully with a wet sponge so that there is no build up of harmful dust. My kilns are also ventilated and I'll even pick up the small one to fire outside if I am concerned about gases.
- 25 replies
-
- 4
-
-
- underglaze
- china paint
- (and 7 more)
-
Currently in my Studio...
Hyn Patty replied to Hyn Patty's topic in Studio Operations and Making Work
After the underglaze layers are all completed and I have applied the clear satin and gloss glazes and fired them on, he then looked like this next photo - but not nearly as dark a sooty chocolate palomino nor as richly colored as I want him to be to match my client's reference image of a real horse she sent to me to copy his color from. So the next steps will be overglazes in the form of china paints. I could push the darks in the underglaze before clear glaze was applied but I knew it wouldn't have the subtle depth and color richness I'm aiming for so patience and layers are worth taking the time to get him as perfect as I am able. Here you can also see that I have worked in a hint of the coat's texture that follows along the hair pattern. I have also added the first hint of a silvery sheen with china paints to the mane, tail and back of the feathers by the time I took this photo.
- 25 replies
-
- 4
-
-
- underglaze
- china paint
- (and 7 more)
-
Currently in my Studio...
Hyn Patty replied to Hyn Patty's topic in Studio Operations and Making Work
Once I got that layer set how I wanted it, I fired it in my smallest kiln to cone 04 to set the underglaze. Then I went back and hand painted some of the details such s the eyes, hooves, and a few other things, then fired him again. This second photo shows the tiny little horse wetted so I can better see the subtle differences in the underglaze before I finish up more details and clear glaze him at cone 06 on a ramped, slow cooling cycle so he won't get too glossy. I use a high gloss for the eyes and hooves.
- 25 replies
-
- 4
-
-
- underglaze
- china paint
- (and 7 more)


