


Kelly in AK
-
Posts
535 -
Joined
-
Last visited
Content Type
Profiles
Forums
Gallery
Everything posted by Kelly in AK
-
I don’t think you can fire Laguna B-mix 5 to cone 10. There is a B-mix 10 that is cone 10 clay. They look the same but they’re not the same formula.
-
You got lab guys there, xrf instruments!? Lucky. I’m mostly out of my league here, but I like @Min’s thought. Perhaps try a soda ash+CaCO3+ “mystery material” triaxial blend. Then there’s borax/boron, which seems like it would flux anything and is a glass former too.
-
There are so many variables it’s difficult to answer the question in a succinct way. The quickest firing I’ve done is a wet pot off the wheel into a red hot kiln. Bisque ware in 30 minutes. The next was bone dry clay, specially compounded for fast firing. Room temperature to bisque ware in two hours. (The clay was awful to work with, and good for nothing but decorative pottery, but did have that one redeeming quality). Plenty of people have done “Raku” firings, glazed ware in an hour. Here goes, an attempt to address the meat of your question: You should fire bisque as fast as you can without the pots blowing up, cracking, the clay carbon coring, or leaving organics in it that will spoil the glaze. You should glaze fire as fast as you can without introducing or creating problems in your glazes and still have them come out looking awesome. The nuances here include, but are not limited to, your clay body and glaze repertoire, your kiln (gas, electric, digital controls, its capability to heat evenly, the speed it can rise in temperature...), how you produce your ware, your workflow, etc. Industrial producers fire very quickly. Kilns are often conveyer systems where work is fed in and out at a set rate. The part of that process that we would consider “firing” proper (say, from 300°-2000° F) can be measured in minutes, not hours. Fast firing is not just relied on to save time and fuel, it can prevent some glaze defects occurring. The clay bodies often contain far less clay than plastic bodies made to form by hand. In my world, yeah, bisque firing takes around 10 hours and glaze firing takes around 8, not including cool down time. Soda firing takes between 10-12 hours because the kiln has to recover temperature after introducing the soda. If I’m reduction cooling it also adds a couple hours because I’m essentially down-firing. Some potters quick cool their glaze firings for the first 500,° others slow cool for matts and crystalline effects. The best speed is the one that makes the best pots, it varies. Generally, in terms of people making and firing their own pots, I don’t think much has changed in the physics of that. Bottlenecks are water smoking (200-250° F), quartz inversion (1063° F), and cristobalite (428° F, on cooling). Important consideration should be given to the burnout of organic matter (1000°-1600° F). Something that has been revolutionary is the advent of digital kiln controllers. To me, the time it takes to fire is not really about the time the kiln takes firing pots, it’s the time I have to spend with the kiln. Pressing the buttons takes about a minute. My bisque firings take about a minute.
-
 I make functional pots, but very much consider them pieces of art. Using a handmade pot can be an aesthetic experience. Interactive, immersive art, if you will. I appreciate sculptural ceramic art as well as decorative pottery, or "pots about pots." Part of that comes from knowing the process and seeing people create marvelous work within the technical limits of what clay can do. I consider function an additional set of limits I choose to work within. I believe the objects I make are more than beautiful things, they help people lead a more beautiful life.
 -
That looks exactly like what I would expect bentonite to do. The part touching water swells and doesn’t let water pass further. A thin dusting might settle right away, but any more than that you’ll have a pile of dry material on top of a layer of impervious wet gel. I’m not sure what the scum on top after it all settled is. Could be bentonite with air trapped as a foam. It should feel greasy, almost soap like, between your fingers. It’s an amazing unusual clay mineral.
-
Something I just remembered seeing years ago was Tom Coleman in a workshop using muriatic acid to suspend glazes. I can’t remember the reason, but he preferred it to Epsom salts. Fizzed up when he put it in. Not something I’d try casually, but maybe worth researching.
-
Hey @Pir, I usually seive twice because I'm obsessed with getting things well mixed, it's overkill except with certain materials (wollastonite and tin are chunky, cobalt oxide has to be well dispersed, things like that). I've read that Epsom salts need clay in the glaze to do it's trick, your recipe has plenty of clay though. I would not have expected that.
-
Because this thread woke up, I read it and was delighted to see a “problem solved” outcome. Happy times. For others in the future, I want to say @Hulk‘s first response explains a comprehensive and reliable solution to application frustration. I’ve never bothered with specific gravity, I’m too lazy, but I generally follow the principles he lays out. My glazes go on smoothly, at the right thickness, and don’t hardpan in the bucket. My fast and loose version is this: Mix the glaze and sieve it twice. Get enough water in it until it looks right when you dip your dry fingers in it (That’s experience and I believe measuring s.g. will allow you to bypass this “gut feeling” method.). It ought to coat your fingers thinly, not thick or goopy and not running off all watery. It’ll be way too runny and thin to apply at that point. Lots of drips and dries too fast*. Add saturated Epsom salts solution a little at a time until the viscosity is right- stir vigorously, pull out the mixing tool and count seconds. It should stop spinning by four or five seconds. If you over flocculate, add water a little at a time until viscosity is good. Most of my glazes use frits, not Gerstley borate, which is a unique glaze gelling animal. Less flocculant required for those with much G.b. *When I say “dries too fast,” I mean the runs and drips where you poured or dipped will have frozen in place before you even finish dipping, pouring, or brushing. I don’t have to wait around for my glaze to dry, but I also don’t have to rush the job to avoid a sloppy looking application.
-
Alternative Deflocculants for Slip Casting
Kelly in AK replied to Ryan M Miller's topic in Mold Making and Slip Casting
I second what @PeterH said. You may have a good reason for exploring alternative deflocculants, but it’s unclear what that is. I haven’t used Darvan, or tried to procure it, but it seems like a winning choice and not hard to get. I know sodium carbonate and sodium silicate are easily available and relatively inexpensive in many parts of the world, certainly so in the US. You shouldn’t have to synthesize anything. Yes, it is possible to convert sodium bicarbonate (baking soda) into sodium carbonate (soda ash) in a household oven, but why would you when you can buy it? And congratulations on learning how important deflocculants are to slip casting! There is lots of good documentation on the process, people have been doing it a long time. As mentioned above, soda ash will eat away plaster molds, especially intricate details. -
My SiC kiln shelves arrived this weekend, I’m so excited… but I accidentally ordered 3/4” instead of 5/8.” After consoling myself with the fact that they’ll take a lifetime to warp at cone 6, I remembered watching Isaac Button load his kiln. I feel better now. I encourage anyone with heavy kiln shelves to watch him load his kiln. Around the seven minute mark if you’re short on time.

-
I have a plaster free studio. I use both flower pot plates and hardie backer board for dewatering clay (which I do a lot of). The 1/2” board I use is smooth. The 1/4” is rough and gets saturated very quickly, I use it for ware boards after sanding it smooth. My wedging table is topped with two layers of 1/2” backer board and works great. It sucks water out so well I have to wipe it with a sopping sponge if I want to use it as a work surface. No warping. The only chore with the 1/2” is cutting it, and I find that easier than mixing and pouring gallons of plaster. The flower pot plates also saturate fairly quickly. I have put slop in them and stacked ‘em to save space.
-
How to lower a cone 10 clay body to cone 7?
Kelly in AK replied to jrgpots's topic in Clay and Glaze Chemistry
Is this premixed, or do you have a recipe you’re looking to adjust? I’m assuming this is a premixed clay body and also assuming (from the name and what I know of Tom Coleman) you want it to look very white when it’s fired. Adding a flux to lower the maturation temperature is not simple. It’ll be either a frit or nepheline syenite, and adding enough will lower the percentage of plastic material in the body. You can’t very well take out the feldspar or silica already in there. If you add clay to make up for plasticity you raise the maturation temperature again. Bentonite could help, but that can push it off white. Veegum is cleaner firing and super plastic but requires even more special handling than bentonite to get it into an already mixed clay. No matter what it’s going to be lots of testing, not just of absorption, but of forming and firing characteristics. Another thought would be to combine a lower firing white clay body with the Coleman White. Again, lots of testing. This one seems like an easier approach. Finding the right body and the right ratio could take some time. Most premixed clays are proprietary recipes, so it’ll be guess and check (systematically, of course). Somewhere on Digitalfire Tony Hansen has written about combining two existing clay bodies to make a very nice stoneware, I just can’t recall the details. That could be a good resource. If you have the recipe and are mixing from scratch, it’s a whole different story. Looking at recipes for mid-range clay bodies could give you an idea of which frits/fluxes people use. Matt Kelleher has also written stuff about tuning clay bodies with frits to adjust their temperature range. Without a doubt someone has done something similar, and with any luck they’ll post their experiences here. Hey, you’re the guy who built the sweet new kiln! Hope that’s going well. -
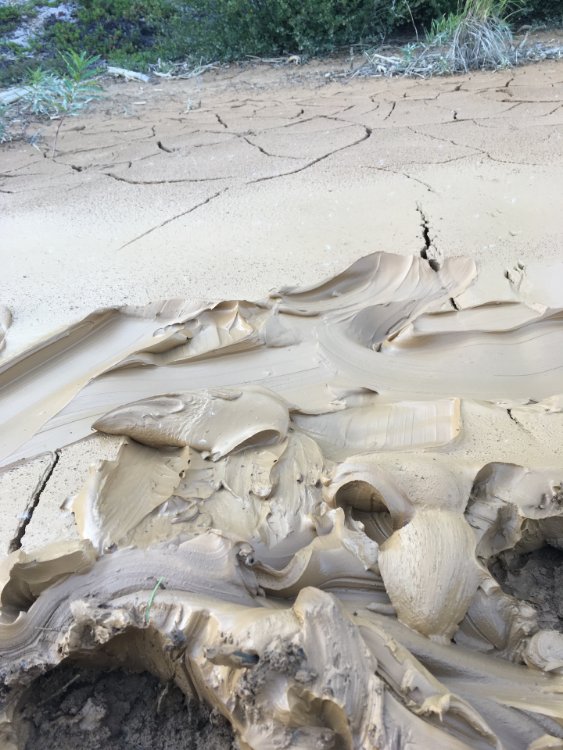
The article by Leela is nicely written, a great place to start if you've never done this before. A couple pictures from an expedition to Sheep Mountain, about two hours from Anchorage. A massive landslide the day before deposited a thick layer of clay right by the roadside. It was happy timing, we had planned a long hike up the mountain to get to a bed of kaolin that's documented there. It was very plastic, threw like a dream, and didn't even shrink that much. Unfortunately this clay was nowhere close to pure kaolin. At cone 03 it softened and expanded into a puffy marshmallow like consistency. The bowl in the back held a sample at cone 6. Bubbly foam.

- 21 replies
-
- 3
-

-
- found clay
- foraged clay
- (and 2 more)
-
Are some cone 5 clays ok to cone 6?
Kelly in AK replied to keridawn's topic in Clay and Glaze Chemistry
I have fired Laguna B-mix 5 to a very solid cone 6 several times without problems. -
I agree with @Pres, it depends. Maybe letting things stiffen a bit and/or using magic water is a more effective way to keep the texture intact. If anyone knows about hand building with impressed decoration it’s Vince Pitelka. He’s generously posted a lot of his teaching materials on his website in the “Documents and Handouts” section. https://www.vincepitelka.com/wp-content/uploads/2021/06/Making-Stiff-Slab-Covered-Boxes.pdf https://www.vincepitelka.com/wp-content/uploads/2021/06/Making-Soft-Slab-Cups-and-Boxes.pdf
-
Too cool. Zanesville, you’re in the heart of clay country for sure. I’ve got some fireclay from around there, it’s refractory (higher firing) and smells of sulfur when it’s wet. Unfortunately I haven’t messed with it enough to say anything more. If your clay is refractory, and I’m taking a guess that it could be, it’ll take a lot of heat to develop any strength. You’re gonna want to make the hottest fire you ever made, and keep it going a while. The forced air ought to help.
-
I use a pounce bag. Plastic bag with sand in it, covered by t-shirt material. This thread has some other ideas that may be helpful.
-
Since you're gathering information, I'll throw something out. My small kiln. It's unsafe because no automatic shutoff system, so don't do what I do. It works very well though. Fires evenly (after fussing with the bagwall a bit), uses very little fuel. Cone 6 is no problem. It's certainly the most bang for the buck of any kiln I've built. Two layers of 1" fiberboard. Kiln shelves with insulation on top are the lid/roof. The burners and adjustable regulators are for propane cookers. For bisque I candle it with a burner from a plumber's torch that's adapted to fit on a big tank. A pyrometer is necessary to keep from blowing things up. Weed burners I've used are awful. Super loud, tricky to adjust, and no less expensive than this setup. The fiberboard shrunk when fired, I had to reset the inner panels after the first few firings. It's also rather delicate.


-
Something I have wondered about is what people’s standard is for functional pottery they’re planning to sell. I’ve seen it addressed in various ways and places on the forum, but with the holidays coming up lots of pots are being sold and it feels like a timely question. Absorption, crazing, pinholes, % of metallic oxides, barium, lithium... lead??? How about “S” cracks? What’s the standard for work you’re sending out into the world?
-
I’m thankful for this question, to hear how others approach the storage issue. Still a work in progress for me. I make my own clay in the summer and use it over the winter. I learned to bag it a lot softer than workable consistency. I always double bag in thick plastic (polyethylene is waterproof but not vapor proof, the clay will dry out) then put in a plastic tote with a lid. Those can stack. I haven’t stored the clay outdoors, but when I get a pugmill I might try that. Sure would open up some studio space.
-
Our ingredients are always several elements combined. They do not behave the same as if you could just put those elements together. To crudely illustrate, using silica and alumina in lieu of kaolin will not produce the same result. Strive to understand the balance of elements in your materials, including frits. It helps you make glaze without having to intimately know every substance and what it does in combinations at a particular temperature or atmosphere. You can look at the material analysis of something and make informed judgments without ever having used it. It’s also important, though, to know the materials well, especially when things don’t do what you expect. For example, tin is a less effective opacifier in reduction, iron becomes a powerful flux, etc. In other words, intimately knowing every substance you use (and some you don’t) is a good thing. Advice: Don’t limit yourself by relying on one or another approach exclusively. 3124 and 3195 have alumina. 3134 essentially doesn’t. Lots of boron in both. You want runny, reduce the alumina. What is the problem here? Is this a software question or a glaze question? Oh goodness. I think my “grumpy old man” just came out. Haha!
-
I respect that sentiment. What is available to you may very well dictate what you make. That is the order of history. In my city there is one other person using the local clay in significant quantities. He makes tiles and that’s all. That’s because it’s the only thing he sees the clay is good for. He is no fool, all my life no one has said the clay here is good for anything. I make pots with it that are functional by any standard, but it has taken a few years to achieve. You will not solve this in days or weeks. You will solve it if it is your path. Alaska has no ceramic tradition. Georgia does. Avail yourself of it. Our cultures are different, I understand that may be easier said than done. I also appreciate your attitude toward fixing the clay issues before considering glazing. You must, however, fire any clay you are messing with. You MUST. It is inextricably linked to producing pottery. A small piece placed inside a container in a kiln poses no risk to anyone else’s work, but will give you a great deal of information. There is no sense in finding clay you can form well but turns into bubbling froth, or remains as weak as greenware, when fired. Your determination and attention to detail are impressive. I hope you solve this, I hope to see pictures of your pottery someday. Pioneer Pottery by Michael Cardew is an invaluable resource. There are sections on clay that would be useful for you now. Other parts of the book will be helpful later. Whether you’re buying clay or digging it up, you can at least be more informed on the basics. It is freely available on archive .org if you can access that.
- 119 replies
-
- 2
-
-
- clay
- recycled clay
- (and 2 more)
-
Cracking handles
Kelly in AK replied to HoneyBee Pottery's topic in Studio Operations and Making Work
Waxing the entire handle ? I wouldn’t do that. They’re cracking mid handle, which suggests your attachments are solid. Like Bill said, a photo makes less guesswork for people who want to help. Extruded handles may have some “memory” issues that could be eliminated when you shape them. -
I apologize for stepping backward a few comments, and am repeating what’s already been said in some ways, but I want to help clarify the language. To “temper” something is to make it useful/manageable. Tempering steel makes it useful for knives, tempering clay makes it useful for pottery. The term “tempera paint” comes from this use of the word, tempered pigments. Concerning pottery, the most frequent place I’ve seen the word “temper” used is from people interested in the archaeology of clay. People more on the making side of things tend to describe specific materials (e.g. sand, grog, molochite, etc.).
- 119 replies
-
- 2
-
-
- clay
- recycled clay
- (and 2 more)
-
I use a commercial cone 6 body for soda firing and one that’s “wild,” fired at cone 03. That one needs a plasticizer (I use 1-1/2% Veegum) and takes a lot of effort to make it usable. I’ve used it for about five years. In the first year I got a lot of information through testing, but I still have a lot to learn.
- 5 replies
-
- 1
-
-
- clay bodies
- clay additives
- (and 1 more)


