

neilestrick
-
Posts
12,377 -
Joined
-
Last visited
Content Type
Profiles
Forums
Gallery
Everything posted by neilestrick
-

What’s on your workbench?
neilestrick replied to Pres's topic in Aesthetic Approaches and Philosophy
Today I threw the bodies and necks for some tall bottles. I really enjoy assembling these. The bodies are 3lbs of clay, 12" tall. The necks only require 1lb since they're so narrow. I'll lose about 3" to shrinkage, so the finished pots will be just under 18".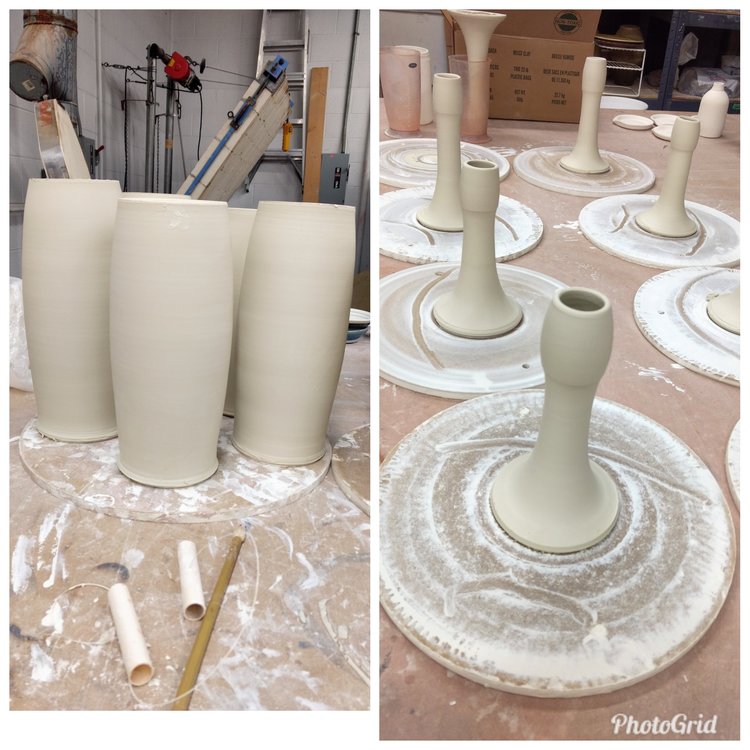
-
What’s on your workbench?
neilestrick replied to Pres's topic in Aesthetic Approaches and Philosophy
I'd use porcelain. The lower the absorption rate the better. -
Geeks only - Raspberry PI controlled kiln
neilestrick replied to jbruce's topic in Equipment Use and Repair
I shoot for 18 inches from flammable walls, 12 inches from concrete. Wood floors are okay if you put down two layers of cement board that extend at least a foot beyond the edge of the kiln. I once worked on a kiln at a school that was on a carpeted floor in their paper storage room. We had a nice discussion about not endangering the lives of hundreds of children. The worst part, though, was that the manual for their old kiln didn't say anything about what type of flooring the kiln should sit on. When I built my gas kiln at my last shop, the fire marshal and building inspector didn't care at all about the safety systems on my kiln burners, probably because it was a concrete free-standing building. What they did care about, however, was the venting system. They considered air quality to be much more of an issue than the flame, because it can hurt/kill you without you realizing it. -
Geeks only - Raspberry PI controlled kiln
neilestrick replied to jbruce's topic in Equipment Use and Repair
It's not that we are held accountable, we're just supposed to do our best to make things safe, based on the knowledge we have. We aren't expected to know everything, and the terms of use say to use the information on the forum at your own risk. We're just trying to make it less risky. @jbruce I still think this is a great project, and like I said before, it's even better because we are discussing the safety issues. Carry on! -
Geeks only - Raspberry PI controlled kiln
neilestrick replied to jbruce's topic in Equipment Use and Repair
Thank you. I've never used one of those, so I wasn't sure how it was powered. To clean up the box: 1. Replace the power cord with a 6ga 3 wire cord. You can reuse the plug, just get a new cord. I buy the SEOW cords from McMaster, about $35 for a 10ft length. They're super flexible and easy to work with. Use a cord grip, or just a simple clamping cable connector to hold the cord securely in the hole in the box. Use a snap-in plastic grommet to hold the TC wire, and another for the controller power supply. You'll have to figure out which sizes you need for each cable. They not only protect the cord from the sharp edge of the hole, but keep the cord from pulling out if you accidentally snag it. 2. You can go with the single leg SSR if you add in a mechanical main relay. Every kiln system I've seen uses a definite purpose contactor (DPST-NO) for the main. Because it is big and your controller has low voltage output, you'll need an intermediate relay (pilot relay) between the controller and contactor. So for the pilot relay you'll need something that has a coil that will work with your controller, either single or double pole. L&L uses their standard 25 amp 2 pole 12VDC coil relays for the pilot. In the Skutt KM-1 external controller, they use a small single pole relay and just run the power for the other side of the coil directly off the main power. I've attached a wiring diagram of the KM-1 which should give you a good idea of how you can do yours. Either way works. The contactor, then, will need a 240 volt coil. You'll have to set up your programming to turn the main relay on and keep it on when the kiln is firing, and off if there are any error situations, or at the end of the firing. The most important error would be to shut it down if the temp is climbing too quickly, which would indicate a stuck relay or TC issue. 3. Make sure you ground the box. 4. If this was my project, I would use a larger box so it's easy to work in, put in a terminal strip where the main power comes in, and distribute everything as needed from there. It'll make the wiring much simpler to deal with, and easier to see what's going on. Terminal connections are much easier and cleaner than wire nuts. I think we're all on the same page here. You've got the thing working, which was the hard part (congrats!), now it just needs cleanup and safety concerns addressed, which is mostly just busy work. It's a great project. @liambesaw I had a small test kiln last year that got really hot during firings. Because the kiln and box were only about 10 inches tall, there wasn't enough draft created in the box to keep it cool like it would in a taller kiln. The controller was getting very close to its max operating temp. So I installed a little computer fan in the bottom of the box, and it made a huge difference. I agree with @Bill Kielb that it would be good to avoid adding in more parts, but it will definitely work if it comes to that. I've also attached a pic of a Skutt with SSRs. You can see the big cooling fins on the box.

-
Geeks only - Raspberry PI controlled kiln
neilestrick replied to jbruce's topic in Equipment Use and Repair
@jbruce Can you tell me how the controller is powered- is it running on 240VAC, low voltage DC, or is it powered by the computer connected to it? What is the output voltage for the relay? -
Geeks only - Raspberry PI controlled kiln
neilestrick replied to jbruce's topic in Equipment Use and Repair
I agree that this is a great thread. No denying that seeing someone build their own controller is very cool. But I do have a responsibility as a moderator to point out things that could be dangerous to others who would copy what's being done here (it's actually in the rules), and for the safety of the person posting. I don't know when a member isn't aware of the safety issues, or is just working through it fully aware that the final product will be done differently. Either way, I think it's good for things to be discussed, for the education and safety and knowledge of everyone involved. I don't think any of it diminishes the value and hard work of what's being done. In fact, I feel like to adds to the project, because it fleshes it out more. As I said before, I wasn't aware of the parallel feeder method, so I have learned something, too. So on that note, I have seen the charts for chassis wiring, and I don't think what you have there qualifies, because those cords are power wires, not chassis wires. Chassis wires are very short single wires connecting parts within the appliance, which are not bundled and therefore can dissipate heat well. What you've got there are power transmission wires, which require a much larger gauge and can be bundled. The chart that Liam posted is a good one to go by. If you look at all the wire gauges recommended by the kiln companies, they go with the 60C column because it doesn't hurt to be on the conservative side. The danger of using them as a parallel system is that if any of the wires in a bundle comes loose, the others will be overloaded and overheat. There are a lot of rules about how parallel systems must be installed because of that, and they're limited to use in very high amperage systems where it's impractical to use large single wires. It's a code thing, not a personal preference. The fact that they're not overheating means that they are, in fact, performing as a parallel system should, but that doesn't mean it's safe. The prototype Skutt SSR kiln I saw had a big heat baffle mounted to the front of the control box just like yours. And their control box was mounted on the kiln. So it seems you're definitely on the right track there. You don't necessarily have to have a fuse in the system, since it's under 50 amps. Once you get over 50 amps you have to have branch fusing in the system. It's another reason production kilns are more expensive than hobby kilns of the same size. More parts, more engineering. Definitely have a fuse on the controller path, but you don't have to have one on the power path. If you do decide to put one in, size it with the breaker. I would put in a mechanical safety relay to kill the whole system in the event of an SSR fusing 'on'. -
Geeks only - Raspberry PI controlled kiln
neilestrick replied to jbruce's topic in Equipment Use and Repair
That's how Nabertherm wires their kilns- one big main mechanical relay coming off the controller safety output, and SSRs cycling the elements. Most brands have not switched to SSRs because it's a more expensive setup than just using mechanical relays, and it would require a redesign of the control box layout to fit everything. That plus most customers don't care enough about it to justify the price increase. I know Skutt has a prototype out there somewhere, and L&L has considered making it an available option. I know they've used them on customs kilns before. Good thread. -
Geeks only - Raspberry PI controlled kiln
neilestrick replied to jbruce's topic in Equipment Use and Repair
I wasn't aware of this practice before now. After reading up on it, I know why- it's only allowed by code for wires over 1/0, which I've never dealt with. And even then there are a ton of rules. Some potential safety issues with that method. -
Geeks only - Raspberry PI controlled kiln
neilestrick replied to jbruce's topic in Equipment Use and Repair
I ran into a kiln like that once, where the previous repair guy had put a Bartlett controller on a Nabertherm and didn't do it right. I got a nice little shock when I tried to push an element in, even though the controller wasn't actually running. Luckily the teacher at the school had never gotten shocked. This is why two pole relays are used. Switching only one leg, the element won't heat up because the circuit loop isn't closed, but when you touch the element and ground it out you'll get hit. @jbruce I'm also worried about the extension cord wires. Those wires are only rated for 12-20 amps, depending on the size of the cord. How did you arrive at it being large enough for 4 times the 40 amps? And if the kiln pulls 40 amps, the wires should be rated for 50 amps, which means you should have 6 gauge wire in there. -
What’s on your workbench?
neilestrick replied to Pres's topic in Aesthetic Approaches and Philosophy
Drill bits are less likely to crack the piece, since they remove material as they make the hole. Hole cutters force the clay to expand to make room for the wall thickness of the cutter. If the clay is too firm, or the hole is too close to an edge, it will crack. The biggest problem with all holes, and one that many, many people do not address, is the sharpness of the edge of the hole. Rubbing out the edge with a sponge or finger takes forever. The simplest solution I've learned is to use a countersink LIKE THIS ONE. Just twist it lightly in the hole once it's just past leather hard, and it will knock off the sharp edge. I use this on all my colanders, and I can do all the holes in a matter of a minute. It puts a nice little bevel that looks rounded once it's glazed.
-
Geeks only - Raspberry PI controlled kiln
neilestrick replied to jbruce's topic in Equipment Use and Repair
Just so you have a point of comparison, I fired my E18T-3 yesterday, a fast bisque firing with a 4 hour preheat, and it averaged about 2,600 relay cycles per kiln section. These are typical mechanical relays. Because SSR's have a longer lifespan, it's okay to have them switch more, plus all that switching can increase element life. When relays switch less, the element has greater variation in temperature. That is, it heats up and cools down every time the relay turns it on and off. The longer the time period switched off, the greater the variation in the temperature of the element. As we know, metal expands and contracts as it heats and cools, and that movement decreases the life span of the element. By switching more often, the element can maintain a more constant temperature, which increases its life. So why don't all the manufacturers use SSR relays? Because they cost more, require an additional safety relay (even more cost), and most people don't care enough to justify the greater cost. -
I've only ever heard reduction cooling to mean reducing during the actual cooling cycle, not heating slower. Yet another confusion bit of terminology in the ceramics world. So what would you call maintaining a reduction atmosphere during the cool down?
-
So that's different than firing in reduction. More like what we call reduction cooling. Firing like the Fallon would not reduce the clay body. No reason you couldn't use his system to reduce going up, though. In grad school I studied under John Neely, who is known for his exploration of reduction cooling techniques, both in gas and wood firings. In those firings the kiln would be fired up in reduction like a typical firing, then also cooled in reduction. In a typical firing, the surface of the clay reoxidizes during cooling, giving the toasty brown colors to stoneware bodies. In reduction cooling, the body can't re-oxidize, so the iron stays black. In bodies with around 4.5% iron, you can get a totally black surface. With short periods of air introduced during cooling it will flash bright orange, red, and yellows. Susan Harris does a lot of really nice reduction cooled work. https://www.artworkscedarcity.com/susan-harris-1
-
Geeks only - Raspberry PI controlled kiln
neilestrick replied to jbruce's topic in Equipment Use and Repair
Google error codes for Skutt or L&L and you'll see that there are a ton of error codes that will shut the kiln down. Most are there so that the kiln doesn't try to keep firing when it's not able to, wasting time and electricity. The commonly seen is Error 1, which simply means the kiln isn't getting hot as fast as the program wants it to. Most of the others are variations of that, with slightly different parameters like whether or not it was during a ramp or cool or hold. Other important codes are if the kiln is hotter than it should be, or one section is hotter than it should be, which indicates a relay that is stuck in the 'on' position. Shutting down the firing with the controller won't stop the stuck relay, but it will shut down the other relays, which will usually prevent an overfiring situation. If you're using a single relay system in an external controller, though, it's not going to help, so second 'safety' or main power relay would be good. -
When clay freezes and then thaws, the water will often migrate toward the outer edges of the block, so get a block that is sloppy wet on the outside and stiff on the inside. It just takes wedging to get it back to normal, but that's more work. Better to avoid the freezing in the first place if at all possible.
-
Geeks only - Raspberry PI controlled kiln
neilestrick replied to jbruce's topic in Equipment Use and Repair
Thanks for sharing! -
Help with using a Duncan Automatic Teacher-Plus Kiln
neilestrick replied to Nataniajoy24's topic in Equipment Use and Repair
Paragon Kilns serviced these kilns for years. They should be ale to give you instructions and/or a a manual. -
I once had a very small studio (120 square feet) in the back of my garage. I insulated it fairly well, and could get it up to 80 degrees with a little ceramic space heater. I loved that little studio. My current studio has a hanging shop heater, and it's pretty loud when it runs. It's nice to stand in the blast zone, though! The studio is really pretty chilly, though, because it has an overhead door that is drafty. I have to keep the thermostat at about 67 degrees or the heater runs a lot, which gets expensive. My students have learned to dress warmly for pottery class.
-
I've been throwing for 26 years, and I'm still getting better.
-
I think that what you get out of school is what you put into it. I know several people who came out of the same programs as me with little to show for it, and others who came out ready to take on the world. I found college and grad school to be a place of a million possibilities. It's where I learned to make pots, and where I learned a ton of technical knowledge that set me on the path toward a career in ceramics. In college and grad school I had far more clay and glaze materials available for testing than I could ever have in my private studio. I had kilns of every type available. I had the knowledge of dozens of other students who had come from other programs. There was no surrendering of free will, self-fulfillment, or creativity. In fact I would say there is far more creativity because a college program has far more resources and knowledge available, which allow you to work in directions you wouldn't be able to do on your own, or didn't even know existed. I had teachers that demanded and supported creativity and experimentation. If I didn't show up to the weekly critiques with something creative I was in trouble. In ceramics, and any art, lack of knowledge and technical skill are stifling. The more you know, the greater the possibilities. And all the non-art classes that I took? Those come in very handy too. Calculus, sociology, biology, writing, Spanish, music, economics, etc. They are all helpful to me as a business owner, husband, parent, and teacher. You can't live in an art bubble. A college program also has a much faster learning curve, because there is a schedule that must be followed in order to get the grade. You either practice and learn the skill, or your grade suffers. An art center program doesn't have that kind of schedule, so the learning curve is much, much slower. Are you really 'wasting tons of cash and years of your life' if you get more skills in half the time? The whole purpose of an MFA program is to create a body of work that can then be produced and sold when you get out of school. I don't see how that is a waste of time or money. It's not any cheaper to learn to make pots at an art center than at a college. Say you take a class at a local art center or studio and it costs $150 a month (which is a little low in many places), that's $1800 a year if you go all year. In that class, you're going to learn, at most, 1/2 of what you would in a decent college program (if even that). I know this because I teach community classes. When people only come into the studio once or twice a week, it takes a lot longer to learn the skills, and the resources aren't there to provide a really comprehensive ceramics education. So if you do the math, you'd need to go 2 years, $3600, to get the equivalent education of one year of a college program. Add in the cost of clay, and in many studios also the cost of glazing and firing, and it's even more. And you probably don't get to load and fire the kilns, or mix glazes, or have formal critiques, or have the variety of kilns and raw materials available to you. Full time tuition at UW Whitewater for residents is $7,692. That's for 4 or more classes, so no more than $1923 a year per class. Yes, there are some college art programs that are very expensive, but you don't have to go to those. I went to state schools that were quite inexpensive at the time, and got a better education than my friends that went to the expensive schools. But I also worked really hard to make sure I got a good education. It wasn't just handed to me. I took advantage of all that was available to me and made sure I wasn't leaving anything out. I spent 40+ hours per week in the studio from day one, 70 hours a week in grad school. I helped our lab tech with all of his maintenance jobs. I learned how to fire every kiln. I built kilns. I ran thousands of glaze tests. Not all schools are the same, not all schools are good, and not all schools are a good fit for every person. You have to do your research and figure out what's best for you. I'm sorry if you've had a bad experience with formal education, but to say that all college is bad is inaccurate.
-
Are you sure the kiln is model P, or is that the model of the sitter? There should be a serial plate on the kiln that says model, voltage, phase, etc. There is little to no information about Nova kilns on the internet. Someone on the forum had one a couple of years ago, and it was a funky little thing with elements embedded in the fiber walls. My general recommendation is to avoid kilns that are no longer made unless you're sure you can get parts for them.
-
Help with using a Duncan Automatic Teacher-Plus Kiln
neilestrick replied to Nataniajoy24's topic in Equipment Use and Repair
If the kiln doesn't have a downdraft vent attached, keep the top peep open throughout the firing. You really don't need to prop the lid. Make sure everything is dry before firing. No need to warm up the kiln before loading. Keep the lid closed after firing until it's cooled down below 250F. If you have a teacher that would let you help load and fire his/her kiln a couple times that would be good. -
Help with using a Duncan Automatic Teacher-Plus Kiln
neilestrick replied to Nataniajoy24's topic in Equipment Use and Repair
You need small cones or bars, for whatever cone you're firing to. Most folks bisque to cone 04, then you'll glaze to whatever cone your clay matures at. Your clay and glaze should mature at the same temp. In electric kilns, that generally means either cone 04/05 or cone 5/6. To use the cone, lift the weight on the sitter, push down the claw that holds the weight, then place the cone inside the kiln on the two bars in the sitter, with the rod sitting on top of the cone. That rod is connected to the claw on the outside. When the cone bends, the rod goes down, the claw goes up and releases the weight which hits the switch that shuts off the kiln. Have the number on the cone face toward the inside of the kiln, so you can see it. The timer on the sitter should be set to about 20 minutes longer than the firing is expected to take. It is just a countdown timer, it does not control how long the firing takes. So you'll need to do a bisque and glaze firing to figure out how long the firing will take and set the time accordingly. For the first firing just set it to 12 hours and do the math afterwards. You need a new cone for every firing. Witness cones are not necessary once you have the sitter calibrated. You may want to use them for the first couple of firings to make sure everything is good. -
I went to grad school with Boomer Moore, who doesn't necessarily make toys, but makes pots that look like toys: Fun stuff!


